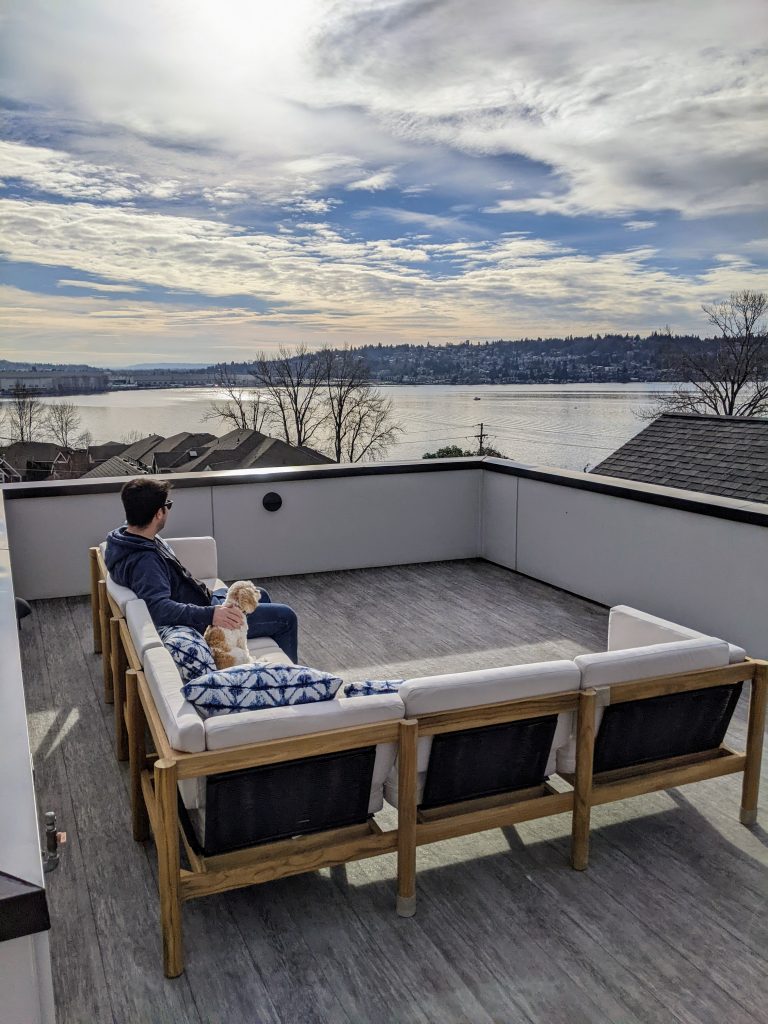
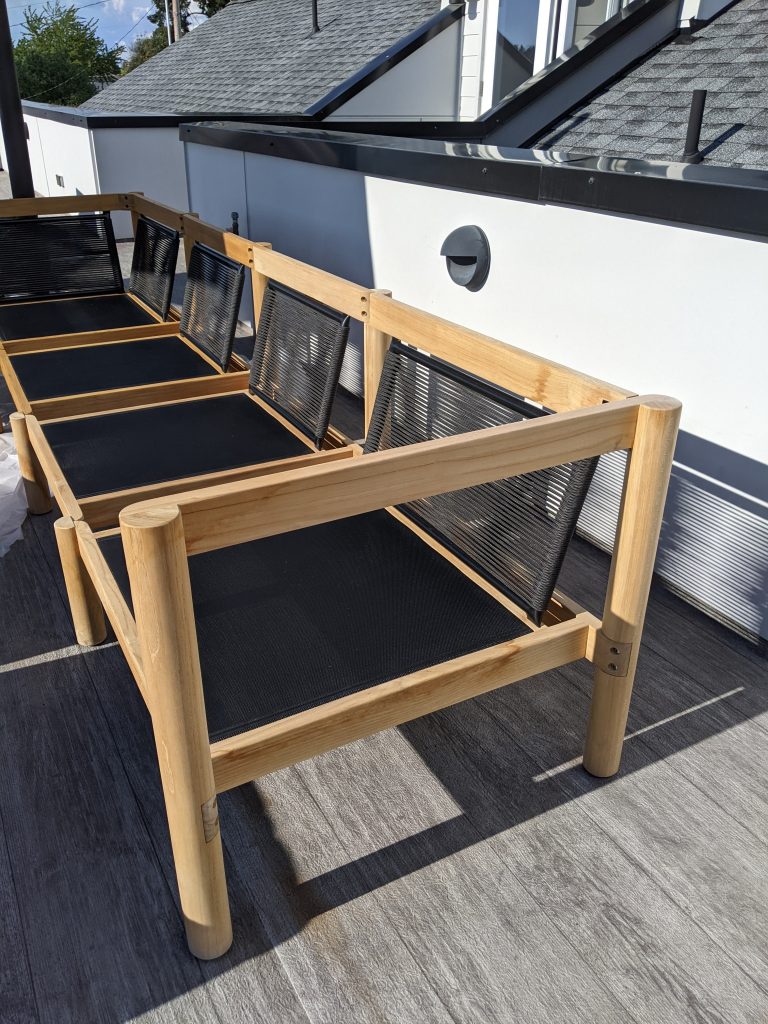
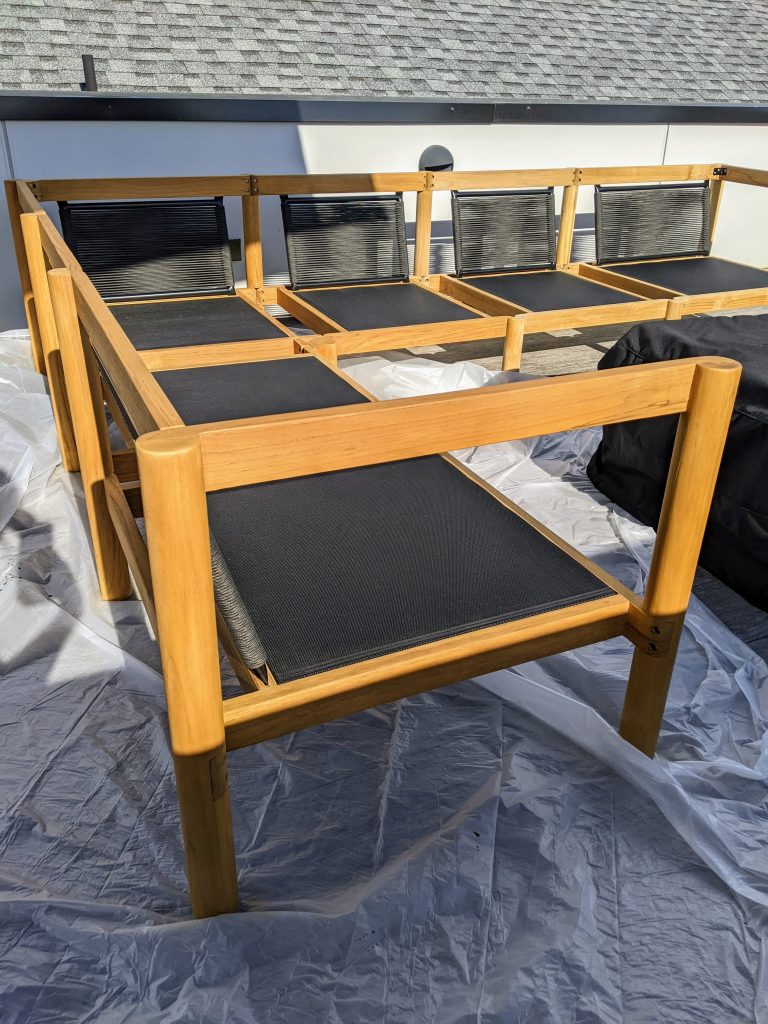
Teak furniture requires some up-keep to maintain it’s beautiful rich color. The sectional in the photo above is from Neighbor furniture. We selected this because we love the look, but also because it’s modular furniture so we can add, remove, and rearrange the sections to accommodate different seating arrangements. All these pieces came flat packed and took about three hours to assemble. The sofa is really great, and we later ordered a couple ottomans to match. If we could make a change, we wish the cushions would attach to frame so they don’t slip. Mmm, future challenge for me?!
There are 2 things I’m doing to maintain our teak sectional:
Furniture covers – Putting a cover on when the furniture isn’t in use. Sun and rain can be really harsh on your furniture. While teak is extremely durable, I’d like to preserve the original rich honey color rather than letting it weather and turn grey. A cover is essential to preserve the color. I will say that the cover we ordered from Neighbor is excellent. It fits perfectly and has ties that go around the legs which is just awesome with the heavy winds we get where we live.
Use teak cleaning and protection products – To preserve the honey color, regular cleaning and a coat of protection is required. Don’t worry, this is easy to do! I found it time consuming, but probably spent too much time perfecting details rather than just getting the project done. See below for before and after photos that make it clear why this is needed.
Before cleaning and protecting
Stunning, right?!
After cleaning and protecting
To keep up the look, you need to do this one or two times per year…
Step 1: Purchase Teak Cleaner and Teak Protector. There are a few brands out there to choose from. I chose Golden Care based on a combo of blogs I read, reviews, and trusting Crate and Barrel’s recommendations.
Step 2: Dust off your furniture with a microfiber cloth.
Step 3: Use a new microfiber cloth to wipe down the teak with the Cleaner and let dry.
Step 4: Get ready for the Protector. You’ll want a drop cloth in your space since this can stain surfaces. Wear old clothes, and rubber gloves to protect yourself.
Step 5: SHAKE IT UP! Shake that Protector a lot.
Step 6: Pour a small amount of Protector onto your fresh microfiber cloth. Then, wipe that on your teak just like you are rubbing stain on wood. Cover the entire piece. You should be able to easily see where you need more Protector based on the color of the teak.
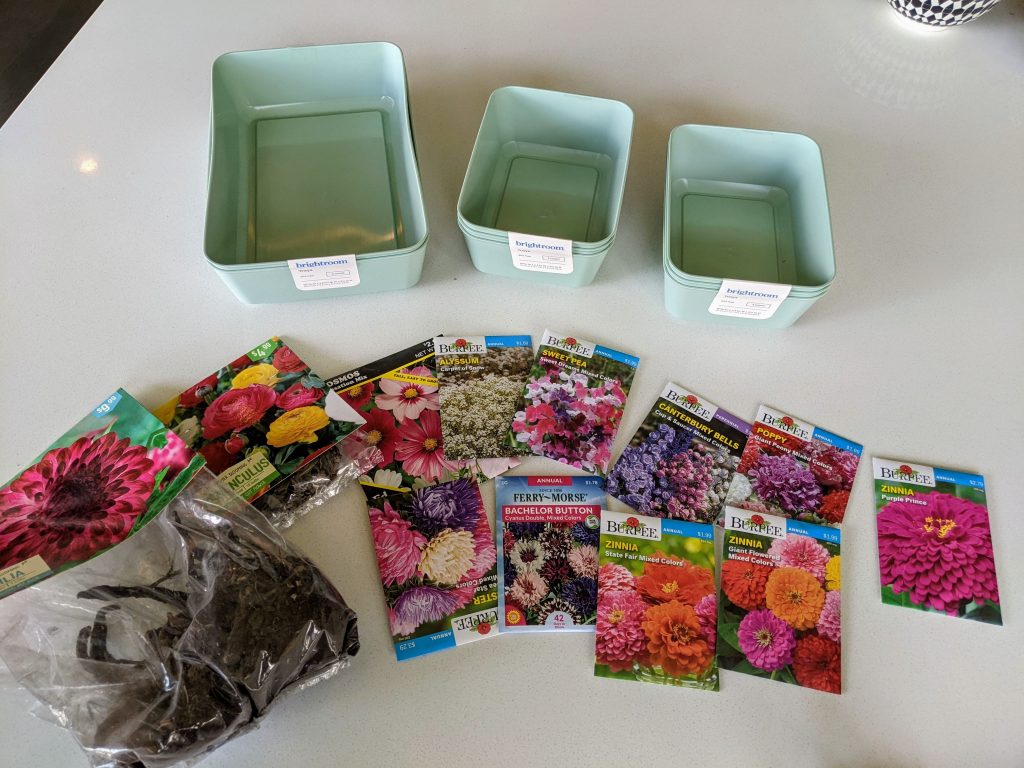
Historically I’ve been a bit of a brown thumb and always stuck to geraniums as the only flower I would grow. This year, I’m still a beginner, but I’m determined to grow some cut flowers that can provide beautiful bouquets this summer. I’m even trying to germinate the seeds myself. If you’re wondering how to start a cut flower garden from seeds. Follow along to see how things go.
First things first, select your seeds and containers. The containers I used are from Target. You can use any containers, you can even repurpose containers from food delivery orders. You’ll also need to select your seeds. See below for what I chose.
Alyssum (part shade, regular watering) – This is doing well. I would also say this is easy to grow.
Aster (full sun, ? watering) – My asters haven’t sprouted, so I will have to get back to you on what I think went wrong if they don’t sprout in another week or so.
Bachelor Buttons (full sun, regular watering) – Thriving! These are sprouted and doing great!
Canterbury Bells – Hmmm. I’ll have to get back to you on these. Mine have not sprouted, so I’m not sure if I’m doing something wrong or if the seed packet was expired.
Cosmos (full sun, regular watering) – My cosmos are thriving too. It took them longer to take off, but I have a ton of sprouts just from 1 seed packet.
Sweet Peas (full sun, regular watering) – My sweet peas finally sprouted about 2 weeks after planting the seeds. I didn’t think they were going to pop up, but now I have many sprouts.
Poppies (full sun, barely water) – I’ve found poppies to be tricky to germinate. I get teeny tiny sprouts and if I water at all, they fall over and only some make it. I’ve read online that the most common mistake with trying to germinate poppies is overwatering. That may be my issue as I’m hypersensitive to drying plants out.
Sweet Peas (full sun, regular watering) – My sweet peas finally sprouted about 2 weeks after planting the seeds. I didn’t think they were going to pop up, but now I have many sprouts.
Zinnias (full sun, regular watering) – I found these the easiest to grow. I swear they were sprouting a day after I planted them. There are many varieties to choose from, and I have 3 different varieties in my trays.
Other – Not in this post, I’m also growing ranunculus and Dahlias.
You’re going to need to carefully read the instructions on the back of the seed packets.
Depth – Each seed has a different depth that you should plant it at. Additionally, spacing is specified.
Spacing – I did not follow the spacing recommendations, so I will need to transplant my sprouts soon!
Soil – You can also choose from different types of soil at the store — types that drain well or hold moisture. I didn’t pay too much attention to this since I didn’t realize that the options existed until a few trips to the store later. With that, just choose some good nutritious soil.
Labeling – You need to label your containers so that you know what you’re growing when your plants start sprouting. I used the packets initially and you’ll see my fun handwritten garden labels later on in this post.
Once you have everything planned out, follow your seed package instructions and plant your containers!
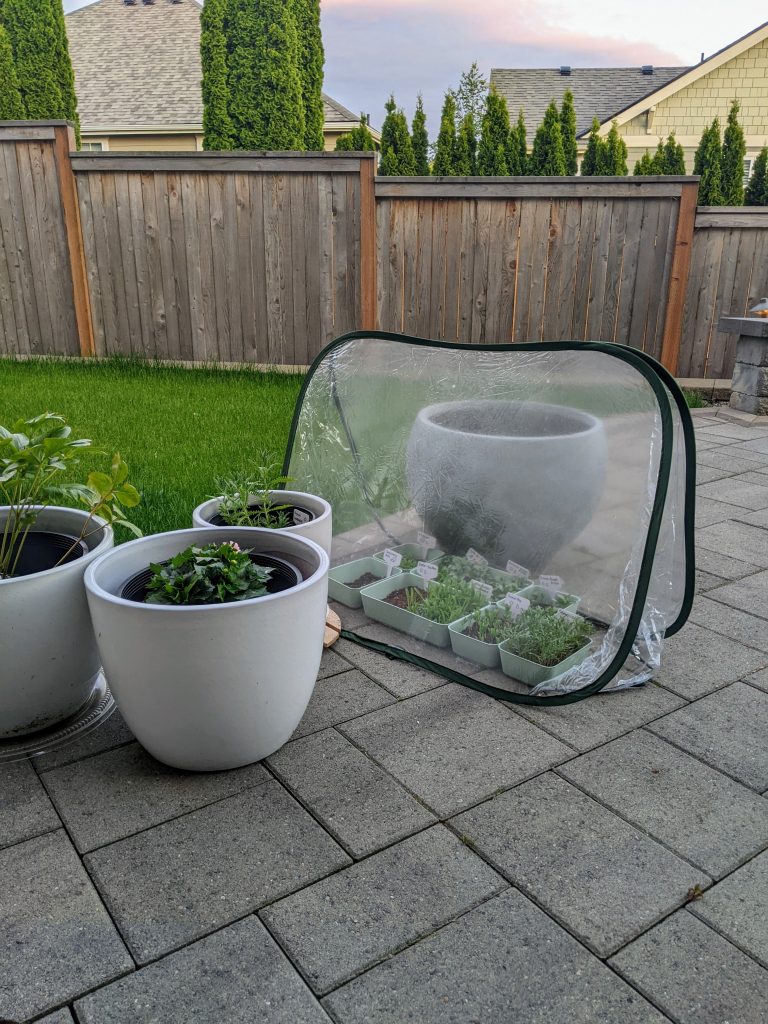
If you want to pamper your little seedlings a greenhouse can be a nice addition. I have a small collapsible greenhouse that I place on top of my plants most days and all evenings. This one will blow off if I don’t put weight on it, so I set pots on the edges which helps provide some shade for my seeds who like shade. If I were doing this in a garden, I could use stakes to keep the greenhouse in place.
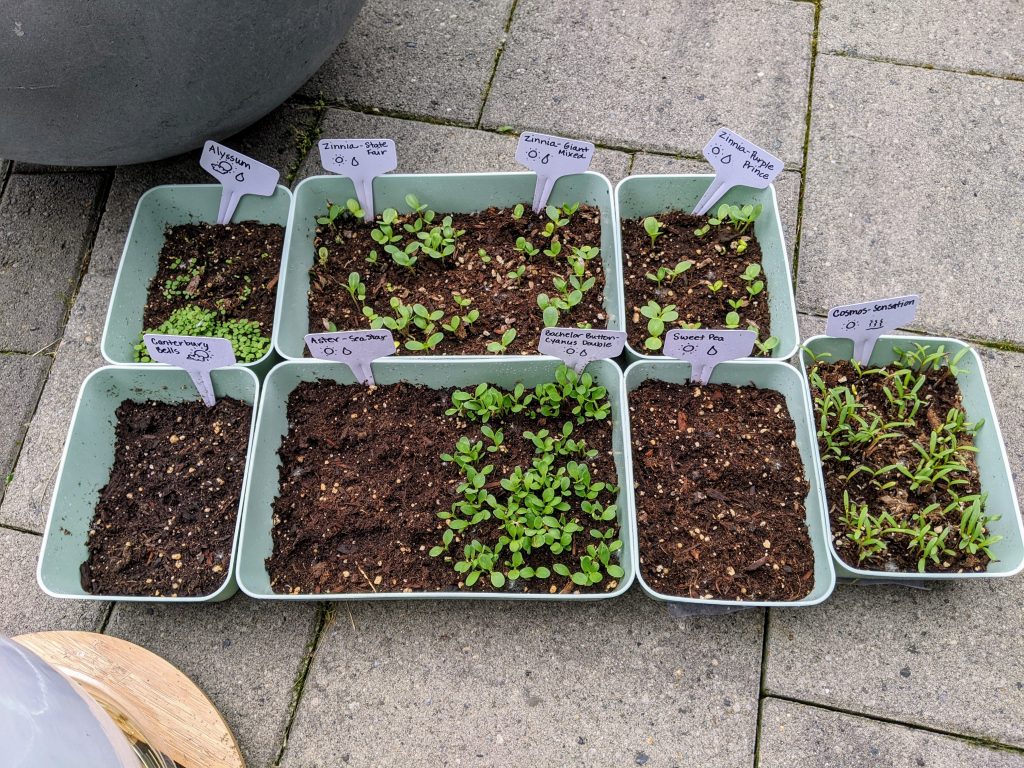
1 Week Update – We have some sprouts! (and cute new handwritten labels)
I’ve been tending to my containers every day. I check to see how the soil is going and monitor the weather to decide if I want to keep the greenhouse on or let the containers get some fresh air. I also made the cutest new labels with some quick sun and watering tips on them. It didn’t take me long at all and they look adorable. I got them from Amazon, here.
Here’s how the seeds are doing (left to right, top to bottom):
Alyssum – half container sprouted
Zinnias State Fair – many sprouts
Zinnias Giant Mixed – many sprouts
Zinnias Purple Prince – many sprouts
Poppies Giant Peony – (not in this photo, I moved them inside under my grow lights) no sprouts
Canterbury Bells – no sprouts
Aster Sea Star – no sprouts
Bachelor Buttons Cyanus Double – many sprouts
Sweet Peas – no sprouts
Cosmos Sensation – many sprouts
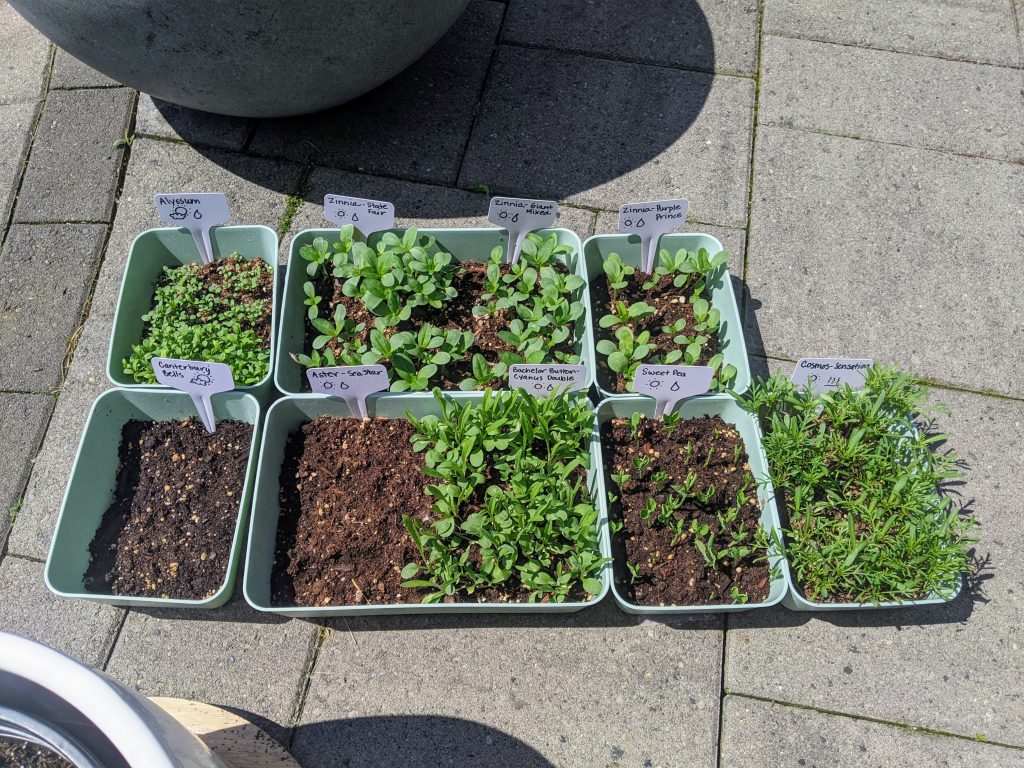
2 Week Update – Wow these are taking off! We better find some bigger containers soon!
Alyssum – Sprouted, thriving
Zinnias State Fair – Sprouted, thriving
Zinnias Giant Mixed – Sprouted, thriving
Zinnias Purple Prince – Sprouted, thriving
Poppies Giant Peony – (not in this photo, still inside) some very hard to spot sprouts. I’m not feeling optimistic that I’ll get any plants from these seeds. Poppies are turning out to be difficult to germinate. I’m going to keep trying
Canterbury Bells – No sprouts, not sure what to do
Sweet Peas – Yay! It took an extra week, but the Sweet Peas sprouted and they’re doing great!
Cosmos Sensation – Sprouted, thriving
As you can see, the sprouts are doing great. Rich and I are going to come up with a bigger container solution this weekend. I’m interested in making a large planter table on wheels so that I can put it in the sun most of the time and wheel it out of the way when we have guests over.
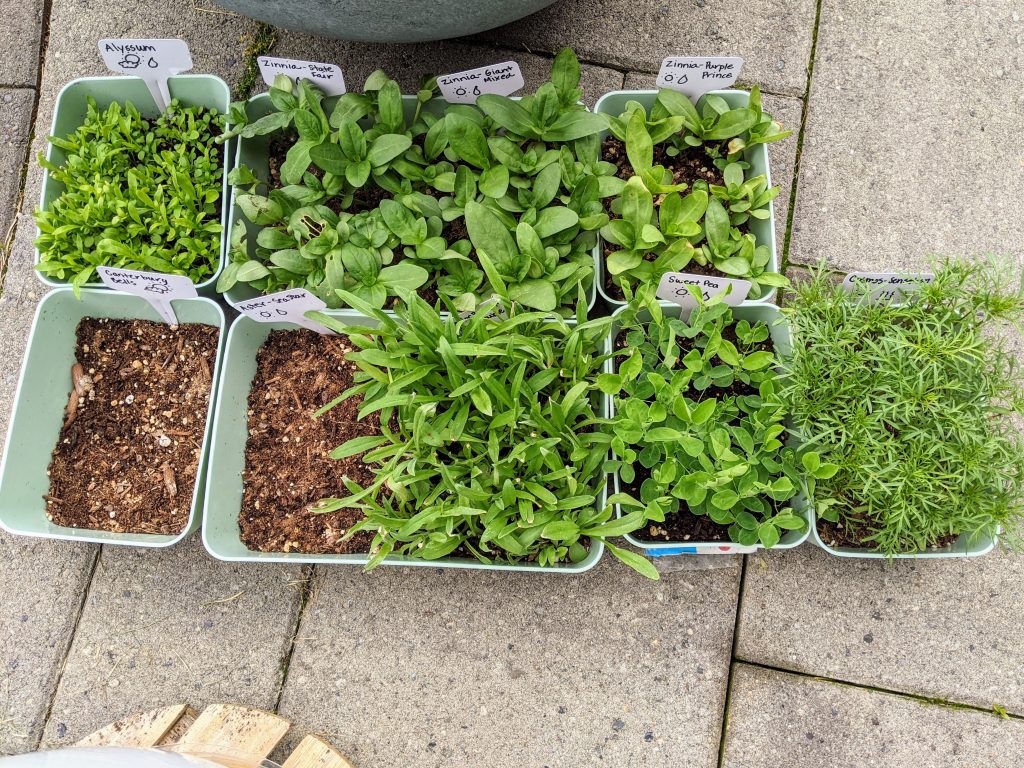
2 Week Update – Now I really need to find these plant babies new homes!
I’ve had a busy week, so let’s make this easy… The sprouts that are thriving are THRIVING! The sprouts that aren’t simply haven’t come up. If you have thoughts on why not, please let me know in the comments. We had hoped to transplant the sprouts into some bigger containers last weekend, but we prioritized time with friends and family. Next weekend, we’ll transplant these cute little plant babies, I promise! No more of these cramped conditions. 🙂
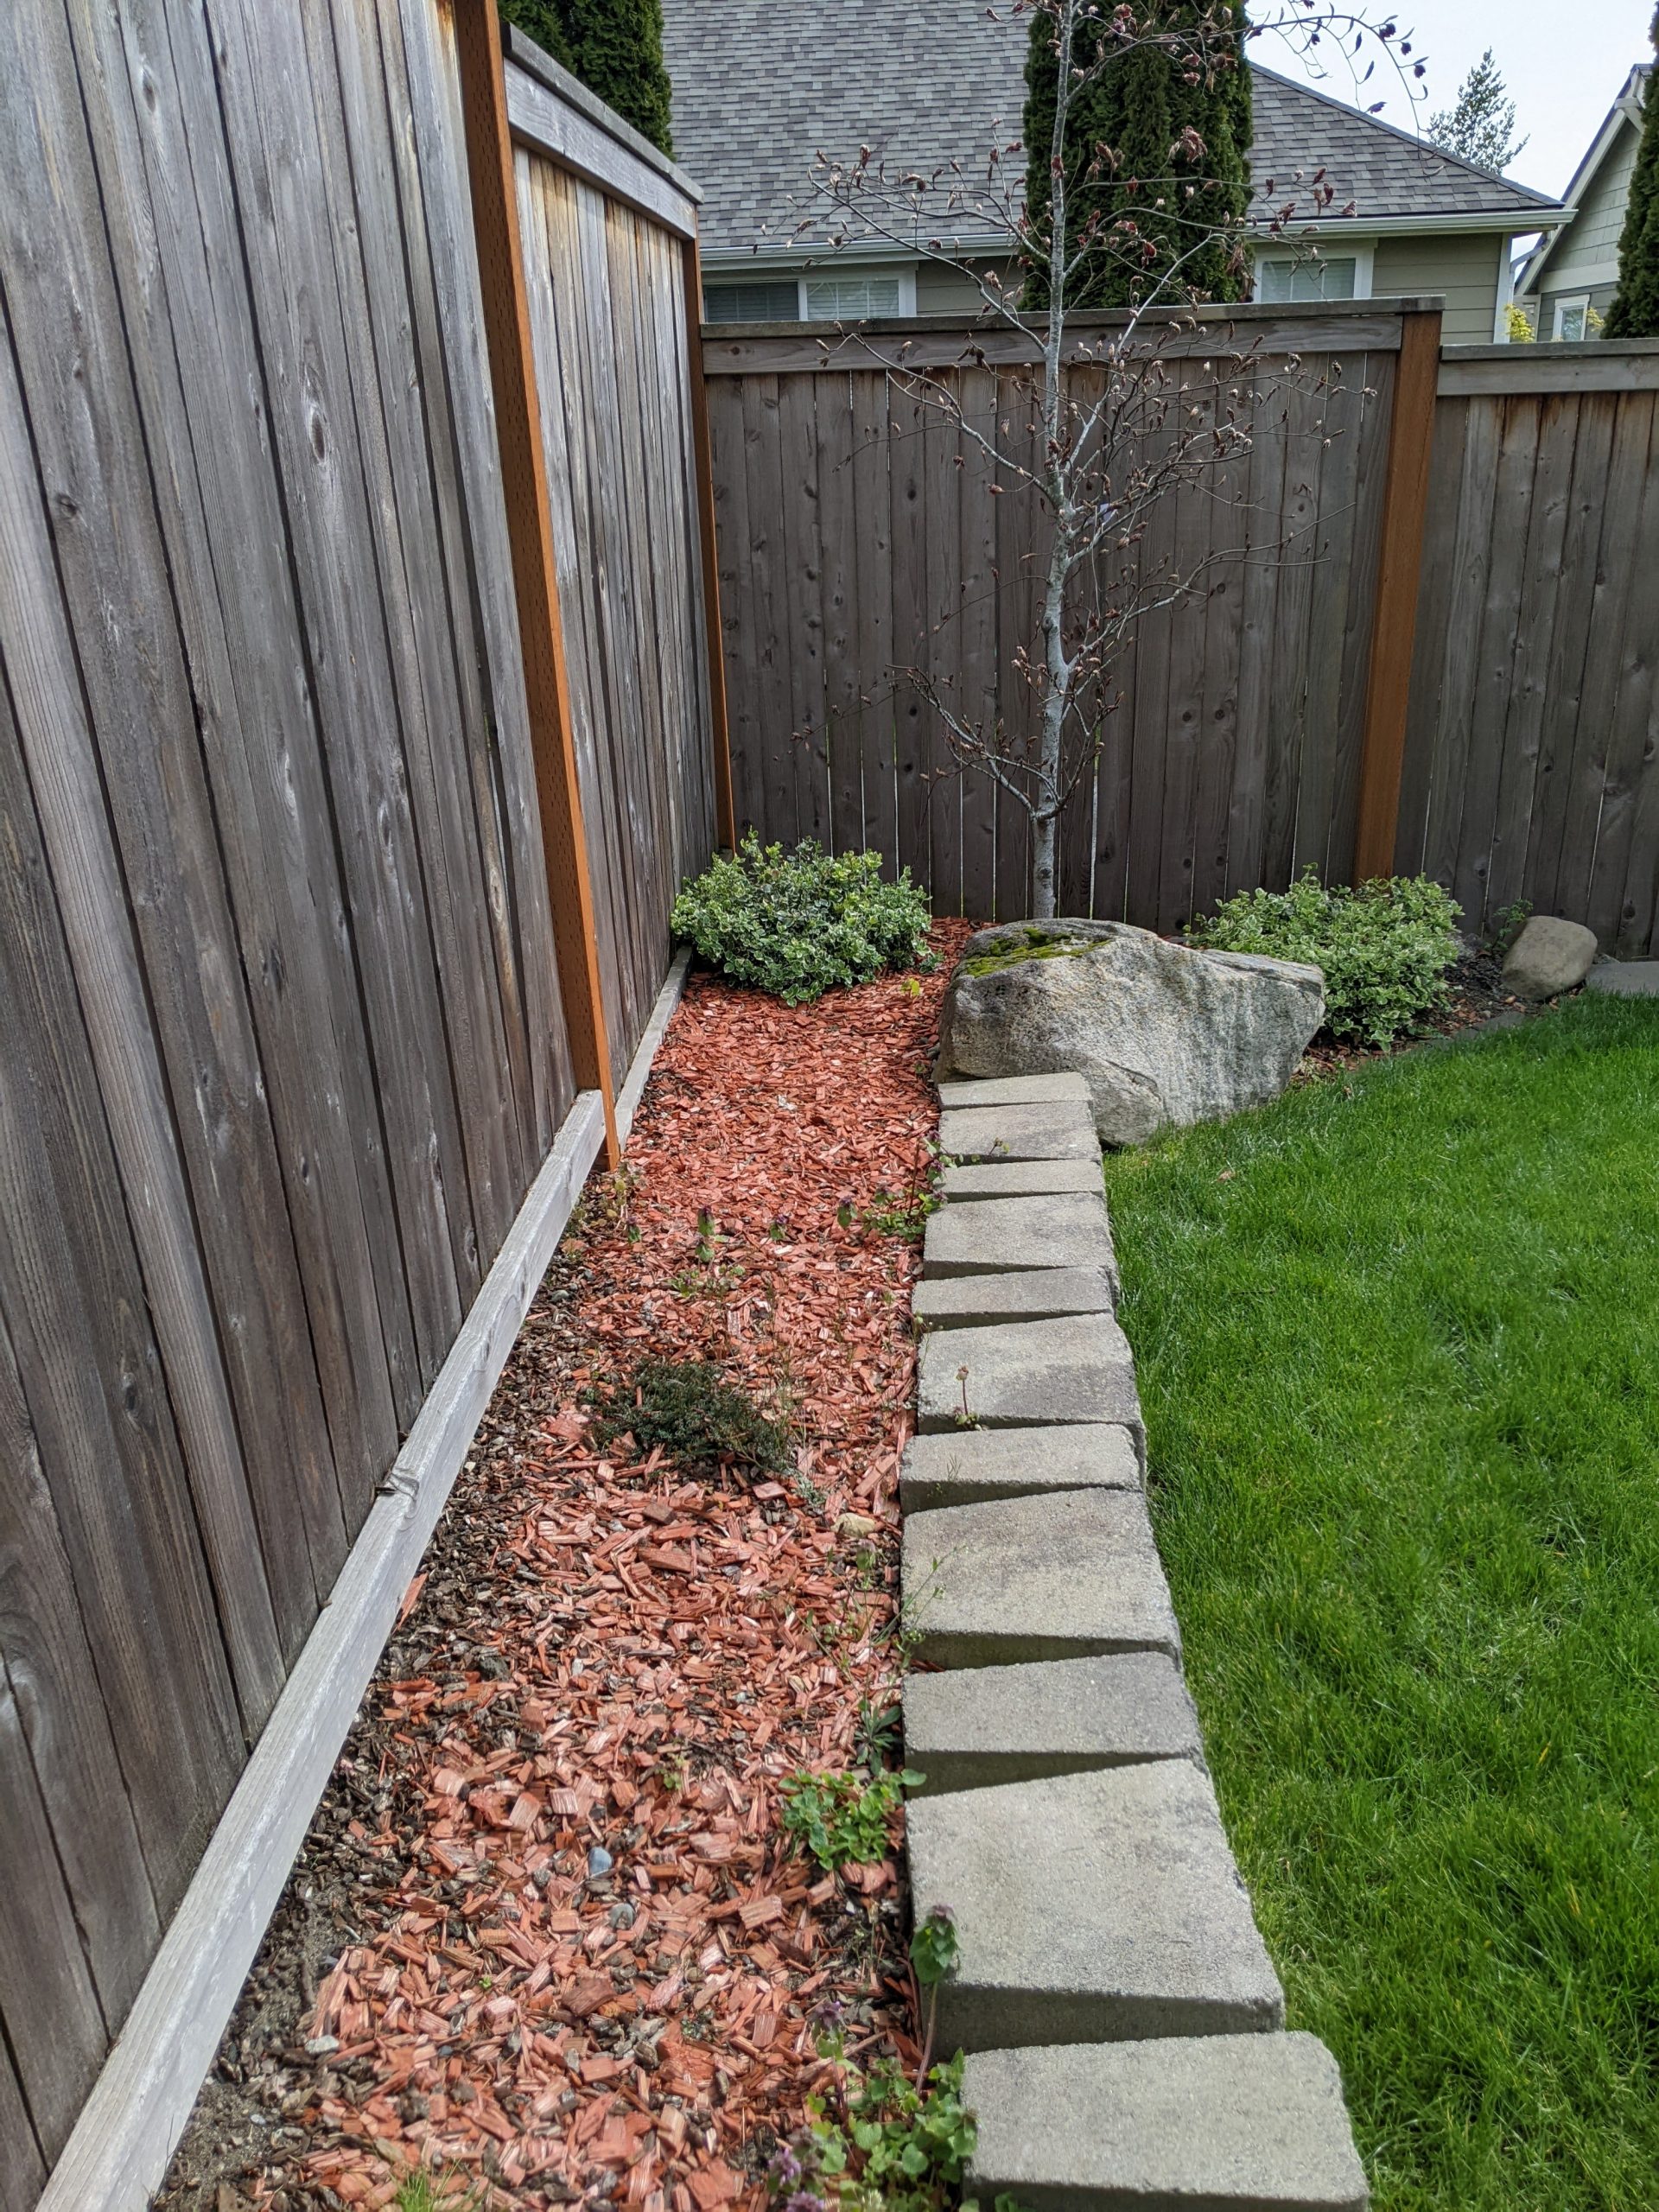
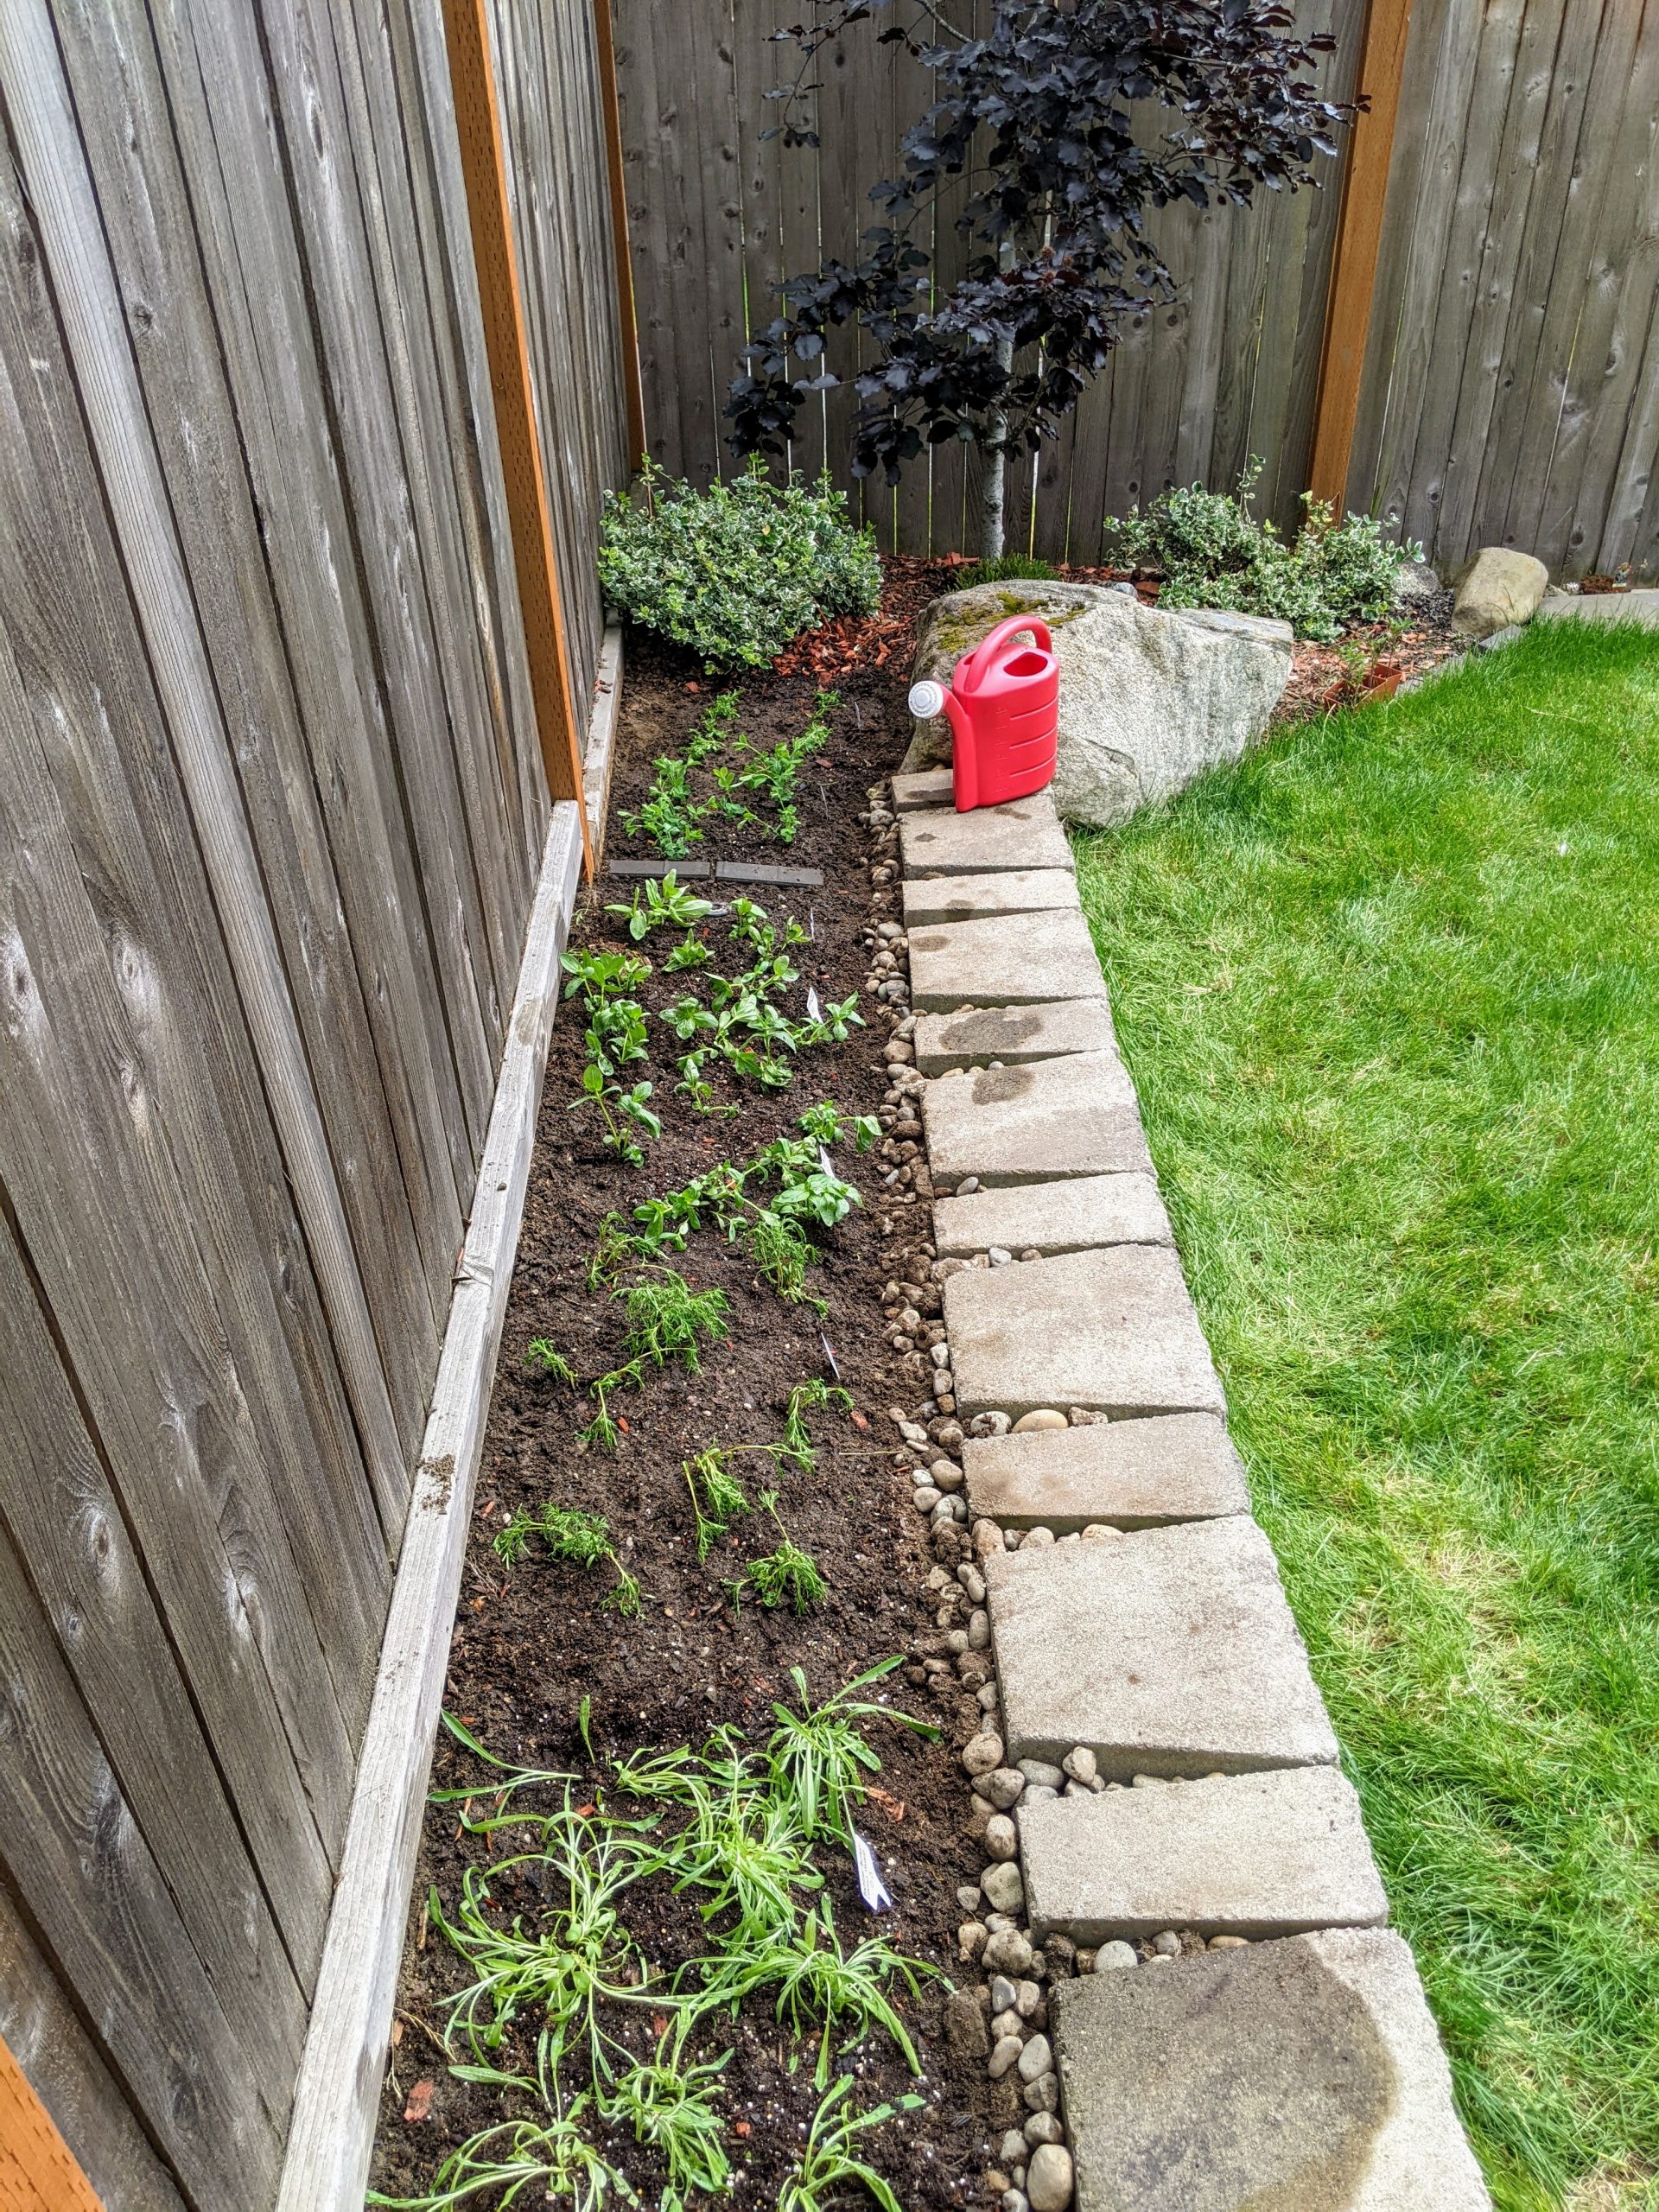
4 Week Update – I did it! They’re in the ground.
This was a several hour project to prep the garden bed, but the results are really great. Here’s what I did.
Slide for the before and after
Removed the bark from the top layer of the soil.
Sorted through the dirt removing all the little rocks.
Re-set the retaining wall.
Filled in behind the wall with the rocks I had removed for stability and drainage.
Mixed fertilized soil in with the dirt.
Planted all the little starts.
Relaxed and enjoyed the feeling of accomplishment.
I planted all my starts in the garden bed, so bottom to top, I have:
Bachelor Buttons Cyanus Double
Cosmos Sensation
Zinnias State Fair
Zinnias Giant Mixed
Zinnias Purple Prince
Sweet Peas
Alyssum
Here’s what I gave up on:
Poppies Giant Peony – I’d get little tiny starts, but they never survived beyond that.
Canterbury Bells – Never sprouted.
Aster Sea Star – Never sprouted.
7 Week Update – Doing well and learning about staking plants and garden pests.
First off, the plants are doing great in their new home! I’ve been giving them lots of water between watering them almost daily and a sprinkler head in the garden bed that runs a few times a week. Weather-wise, summer is finally hear, so the plants are getting sun almost every day. There are two new things I’m learning about, staking plants and pests.
Staking plants – Pretty easy. Sweat Peas need a lattice to grow up and we had one on hand that I put in the garden today. I’m keeping an eye on how tall the cosmos and zinnias get. They may need some stakes to keep the stems from breaking. If they do, I found some nice strong, reusable 23″ stakes at Home Depot that I am using for my dahlias, and I can get a few more for these flowers too.
Pest control – The problem isn’t too bad right now, but some of the Zinnias are getting holes in their leaves from garden pests. I’ve been spraying the plants with an organic pesticide regularly, but there are still more holes in the leaves. I think I found our culprit. When I was cutting some of my dahlias the other day, a few earwigs shook out of the flower petals. The holes in the leaves are similar to what I see online for earwigs. When I was at Home Depot today, there was a master gardener there who I chatted with about the issue. She said that it’s best to create traps and then squish the earwigs rather than using a really strong pesticide (most pesticides won’t kill earwigs). Tonight, I’m going to put oil and soy sauce in some old dip containers next to the plants that are most effected. We’ll see if I catch any of these pesky plant eaters!
One other thing to note is that the Bachelors Buttons haven’t been doing quite as well as the other starts. They seem to need a LOT of water. When I water them, they perk up. That said, I think a bunny might have come into the yard this week and nibbled on a couple of the starts because they look like they were cut down to the ground.
Let me knw what questions you have in the comments. I’ll have more to share soon!
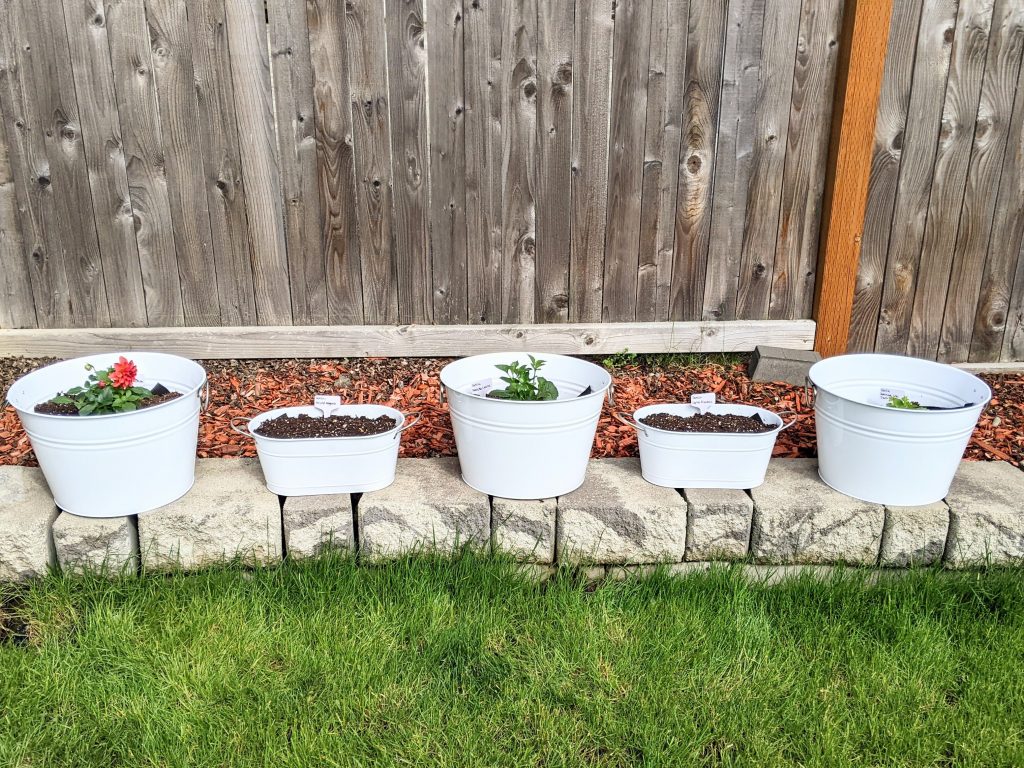
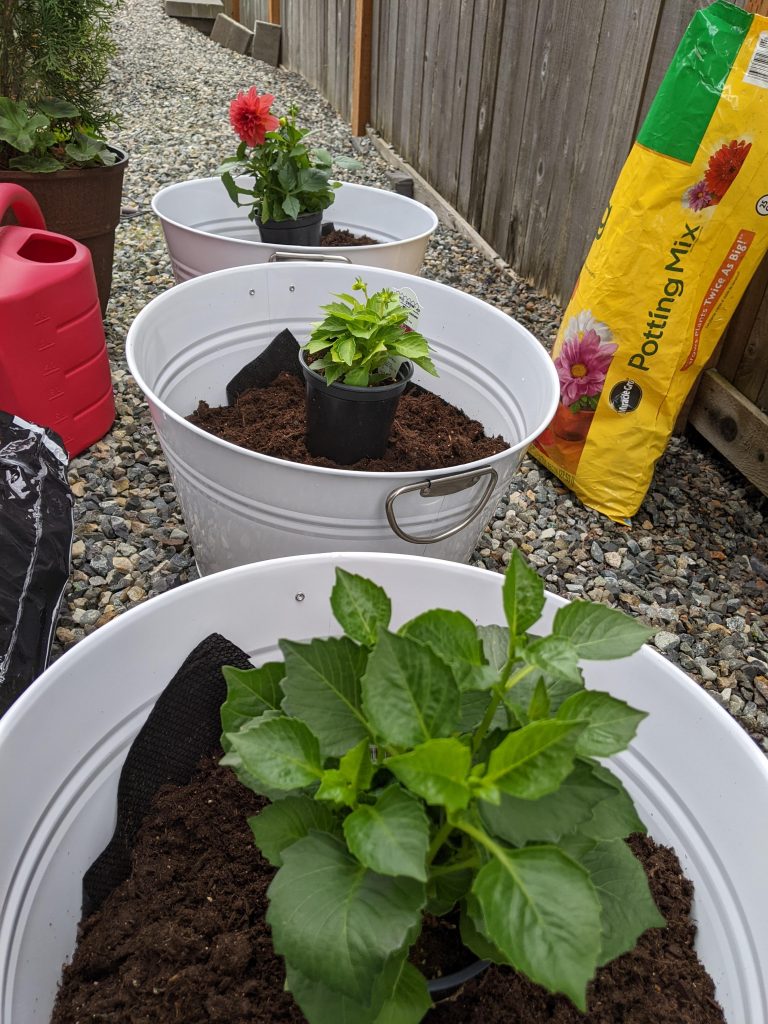
Getting your toes wet in gardening can be both fun and expensive. I got a bit overwhelmed when shopping for planters this year. That’s when I decided to make my own DIY flower pots for my beginner container garden. These were really easy to make. They only took me 1-2 hours from start to fully planted. The planters look great and *BONUS* because they have handles, they’re easy to move around my yard.
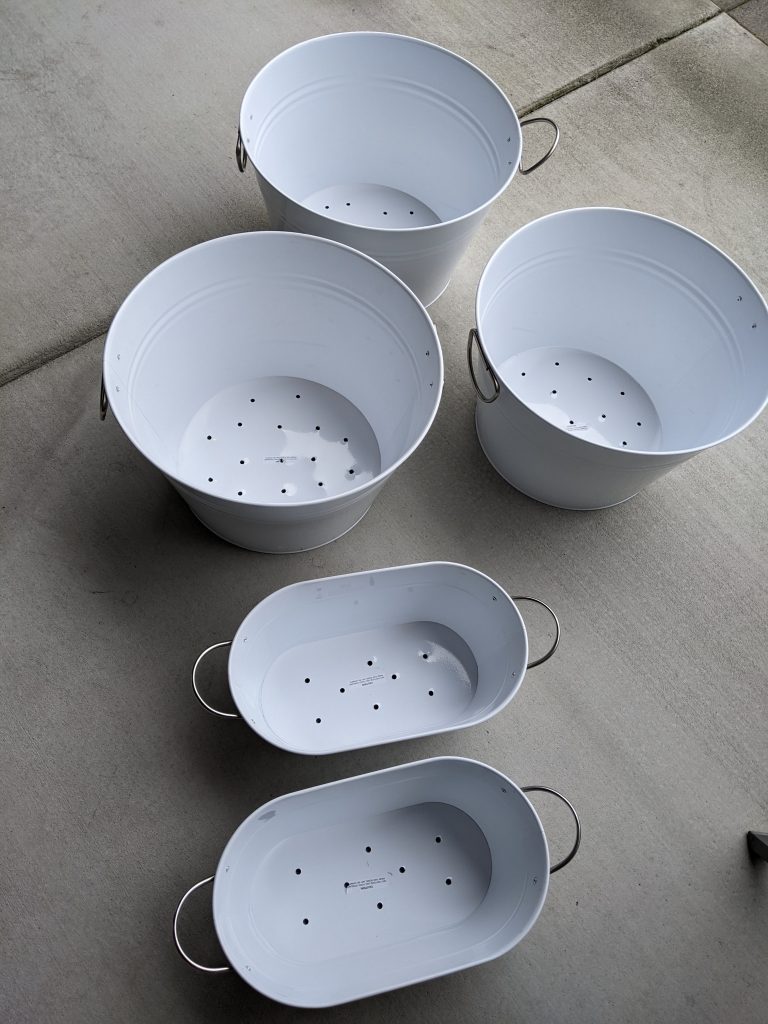
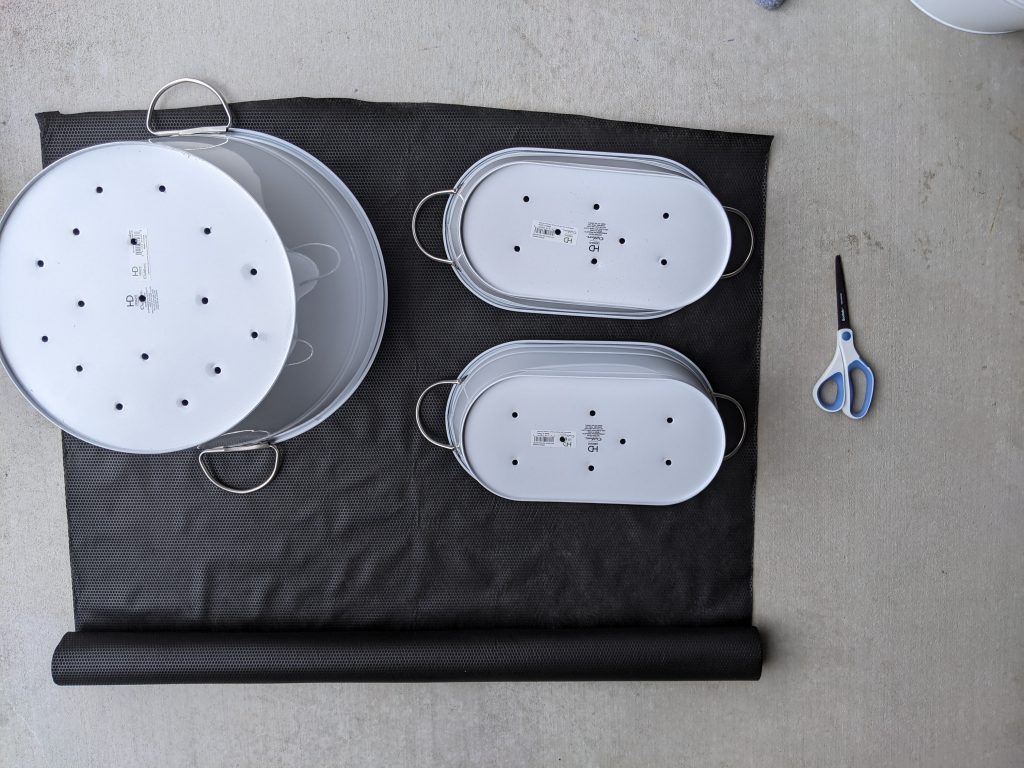
Step 1: Purchase metal containers from your local store. These containers are from Fred Meyer and they were on sale, buy one, get on half off. The total cost of the containers was about $15/large and $7/small.
Step 2: The first thing I did was drill holes in the bottom of the metal pots I bought. I doesn’t matter what pattern you drill the holes in or if they are equally spaced. Just make sure to drill enough holes for good drainage. When drilling into metal, you need a special drill bit. Be sure that the drill be you are using is rated to cut metal.
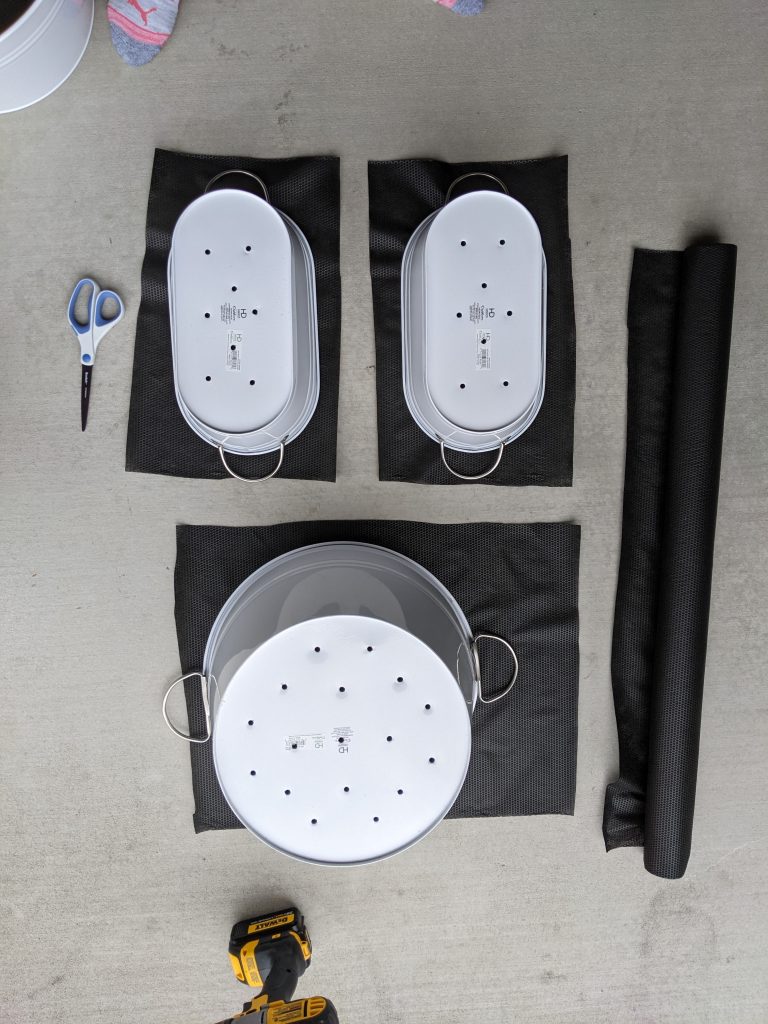
Step 3: Next, I wanted to line the bottom of the planters with landscaping geotech fabric to keep dirt from falling out the bottom of the pots. First I set the pots on the fabric. Then I cut around the pots without much worry about how perfect the cuts were. It’s ok to have extra fabric.
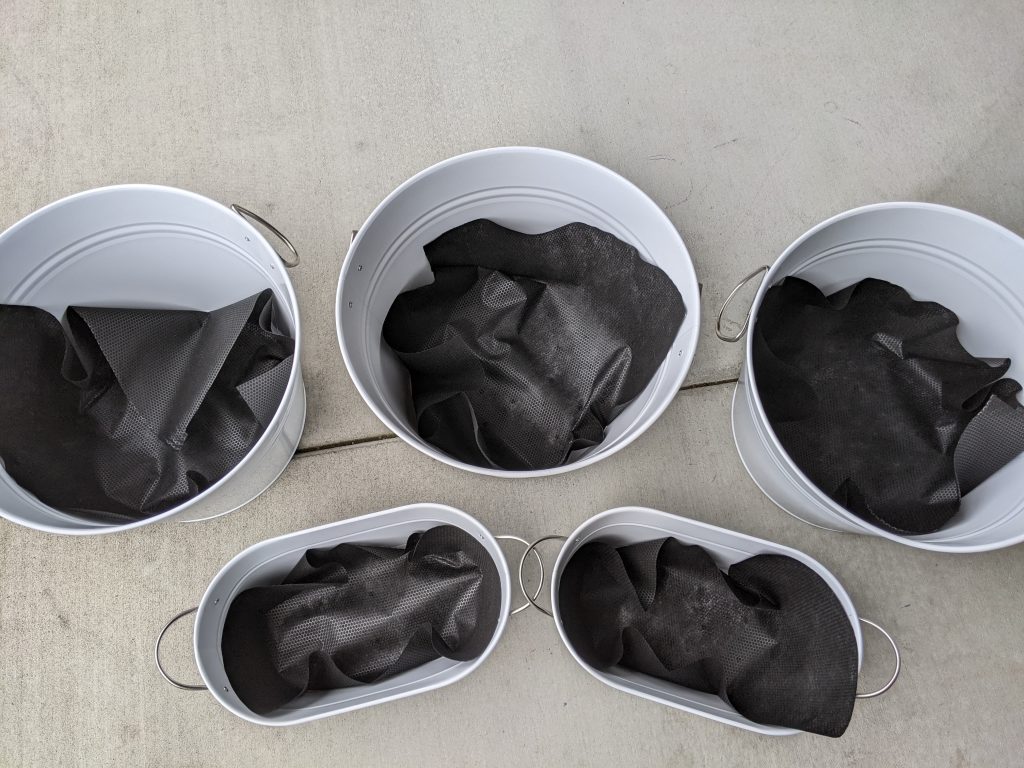
Step 4: Once the fabric was cut, I simply placed it in the bottom of each of the pots. I then tested to ensure that water could easily drain from the pots before starting to fill them with rocks and dirt.
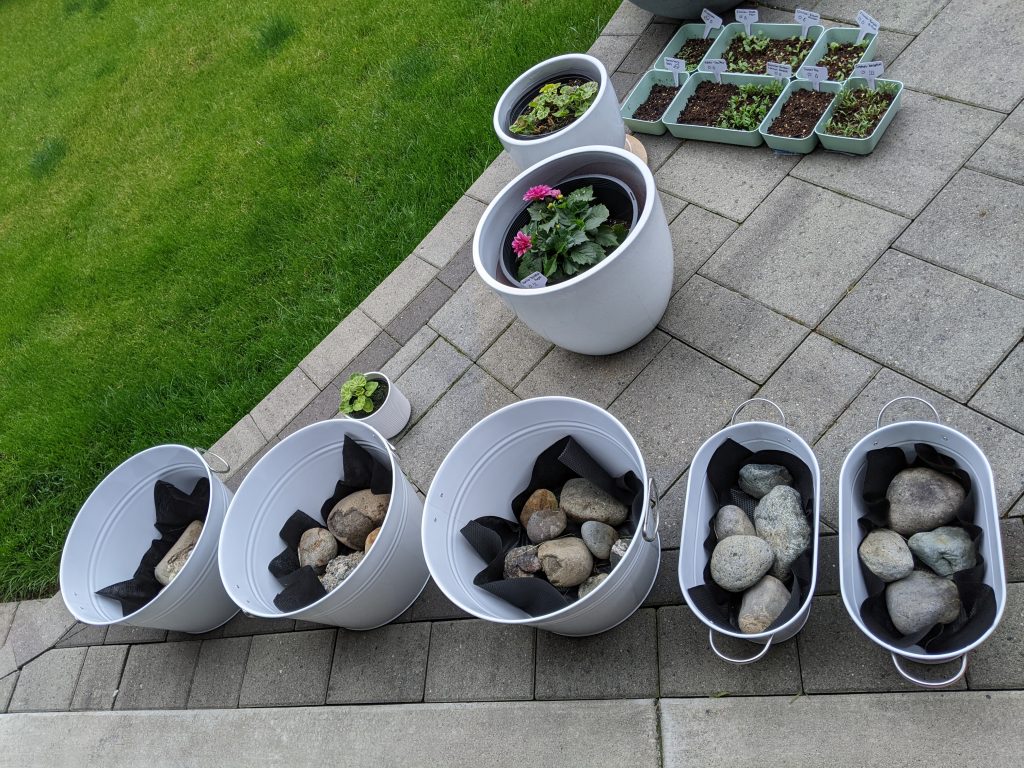
Step 5: Add rocks to the bottom of your planters. I gave my husband a good laugh as apparently you usually use smaller rocks to help with drainage. I didn’t have smaller rocks on hand, so I picked these up from our back alley. They worked just fine. The rocks are holding the fabric in place, weighting the planters so they don’t tip over, and taking up space so I don’t have to use all my soil in one pot.
Step 6: Start filling the planters with soil and planning out which plants you will put in each planter. It’s important to read the labels of your plants when planning your container garden. Many plants like these dahlias will require a very large planter since they grow to be much larger than the initial sprouts.
Step 7: Plant your pots! This is the most rewarding step a you are all done once your plants are planted!
I really enjoyed this easy DIY project, and I hope you do too! Making a DIY container garden is something anyone can do no matter how much experience you have or not. Wishing you all the best in your gardening adventures!
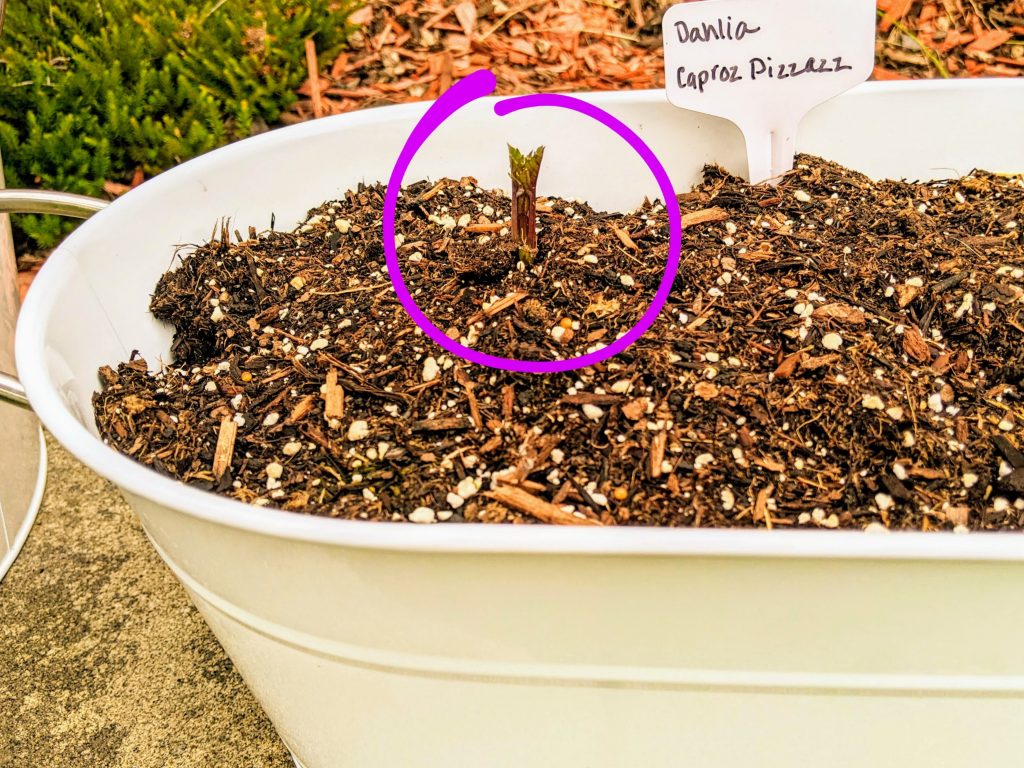
If you want to follow my journey and learn along with me as a first-time dahlia grower, you are in the right place. This post documents how to grow dahlias in pots. I live in Washington state, home to the famous Erin Benzakein of Floret Flowers. She’s an internationally know florist who spent years growing her own flowers in Skagit County. You might call her the queen of dahlias. 🙂 She even has a few books about gardening, one of which is a NY Times Best Seller! I recently watched her documentary, Growing Floret on Joanna Gains’ Magnolia Network, and that’s when I was inspired to grow my own dahlias.
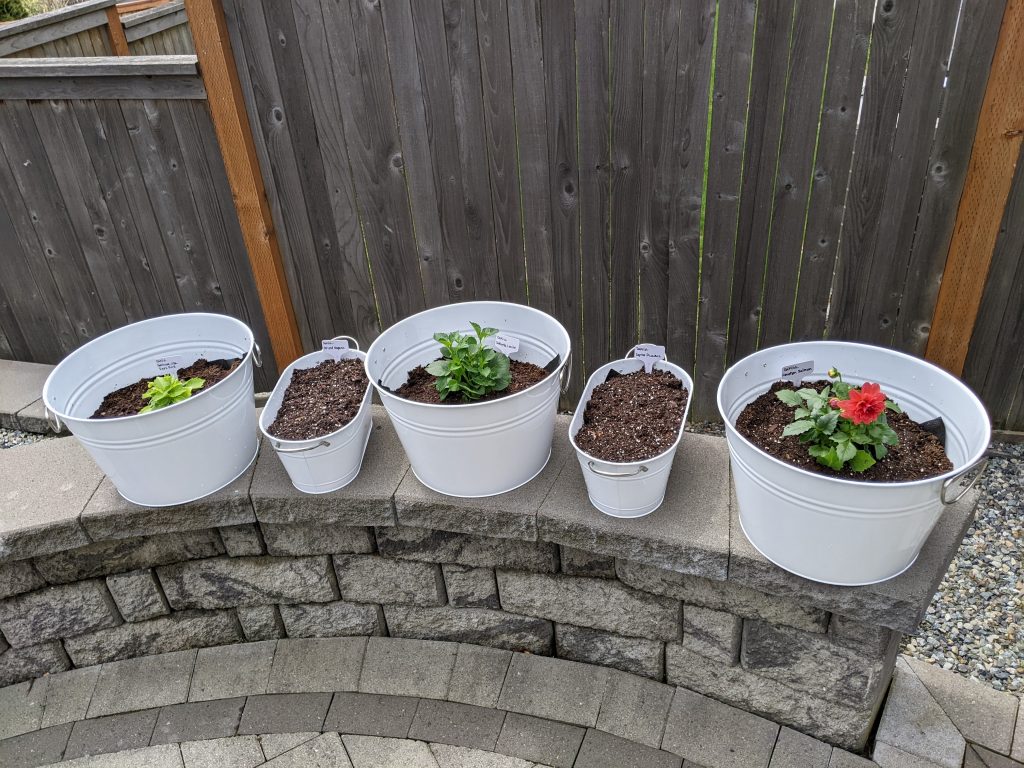
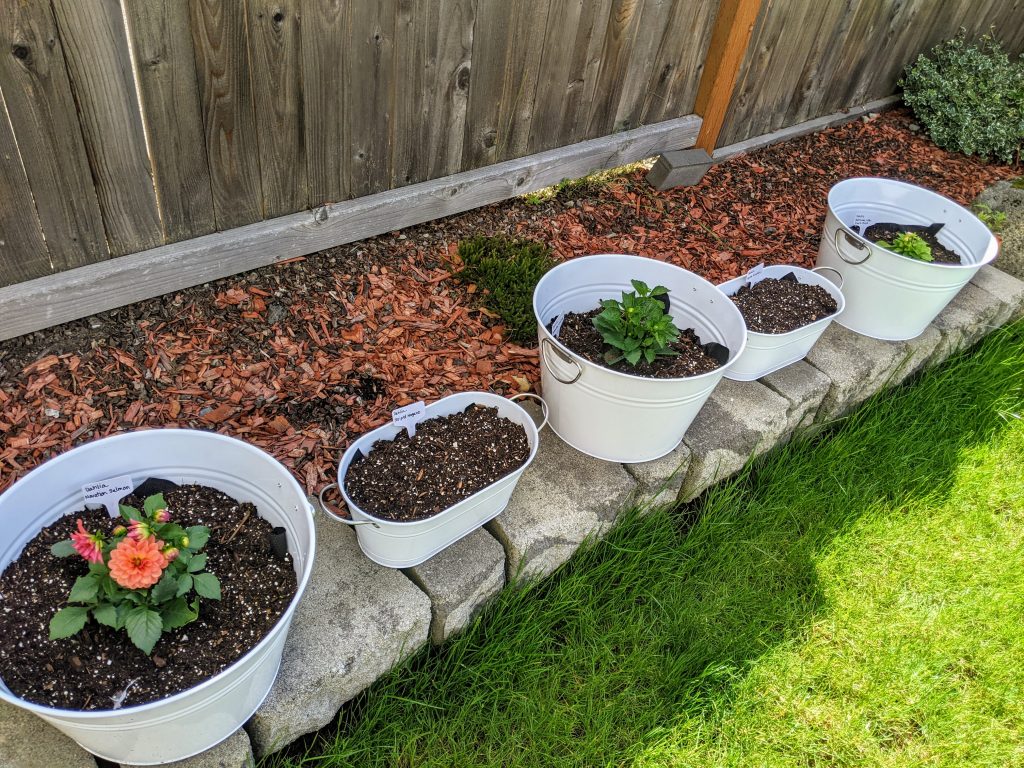
Day 1: 3 Dahlia plants purchased at our local Fred Meyer and 3 tubers planted. I’m so excited about growing dahlias that I ordered more online that should be here soon as I was feeling desperate to try the Cafe au Lait variety. They are the dinner plate size and simply a beautiful white, blush, pink that will make stunning bouquets.
Over the last week, I did a ton of research to get ready to plant my dahlias. Here are a few tips I learned from my research.
– Large planters! You need a large pot for Dahlias, 12″ or bigger for each tuber because the tubers can grow quite large. I’m starting the plants in 14″ planters that I made myself. More on how to make your own planters here. And the tubers are in the smaller planters. I have no idea if they will take off. If they do, I’ll need to move them to bigger planters to accommodate the tuber growth.
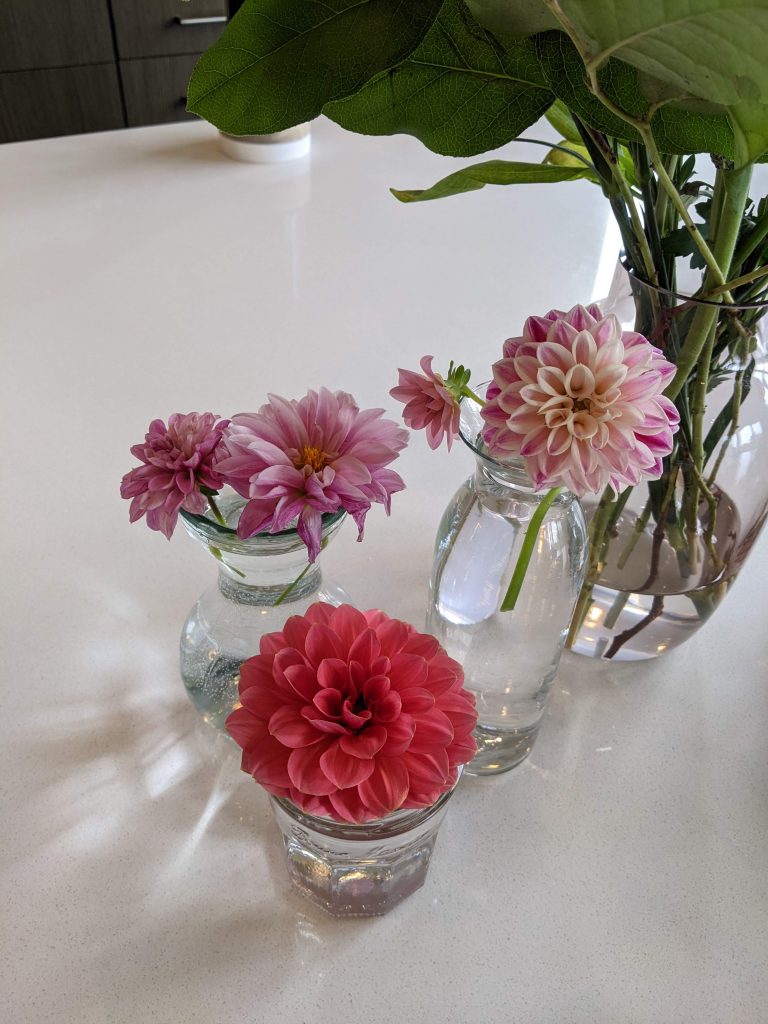
– Flower cutting Cut the flowers when they are as full as you’d like them to be in your bouquet. Dahlias don’t continue opening once cut. Additionally, it’s very important to cut the flowers back or deadhead them as going to seed could cause your plant to stop producing flowers.
– Watering Don’t water tubers when you initially plant them. This is because you don’t want to rot the tubers. (Oops! I watered mine and we’ll see how they do.) You want to plant the tubers and wait to water them until after they start to sprout. Then, water a few times per week.
– Sun These are a full sun flower so best to pick the sunniest place in your yard for your dahlias.
I will share an update on how things are going in a few weeks when there’s progress to show. More to come soon!
1 Week: Not much as changed. So many blooms on the plants that I purchased. The tubers haven’t come up yet. I received more tubers in the mail that I’ll plant next weekend. I’m so excited for these plants to reach their full size, I can hardly stand it. In the meantime, it’s nice to have the plants that were already started so that I have little blooms to clip and keep in my kitchen.
2 Week: Woo– We have a tuber sprouting! Just 1 of the two are sprouting. I still need to plant our other dahlias, but it’s been a busy week. This sprout is re-energizing me to get the other tubers in some dirt.
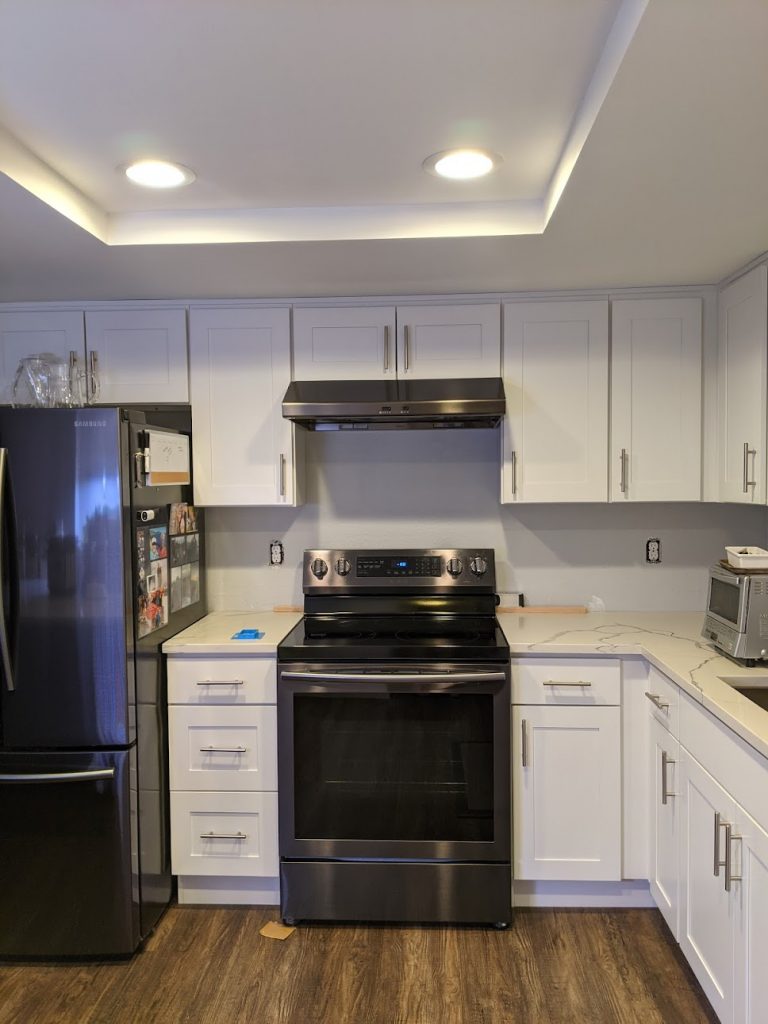
This blog is long past due. 🙂 This spring I did my first tile project, and it turned out awesome! I learned a lot along the way which I will share in the post. As a beginner, I would have made a few different choices, but I’m very happy with the end results. Yes, you can tile too– I say go for it!
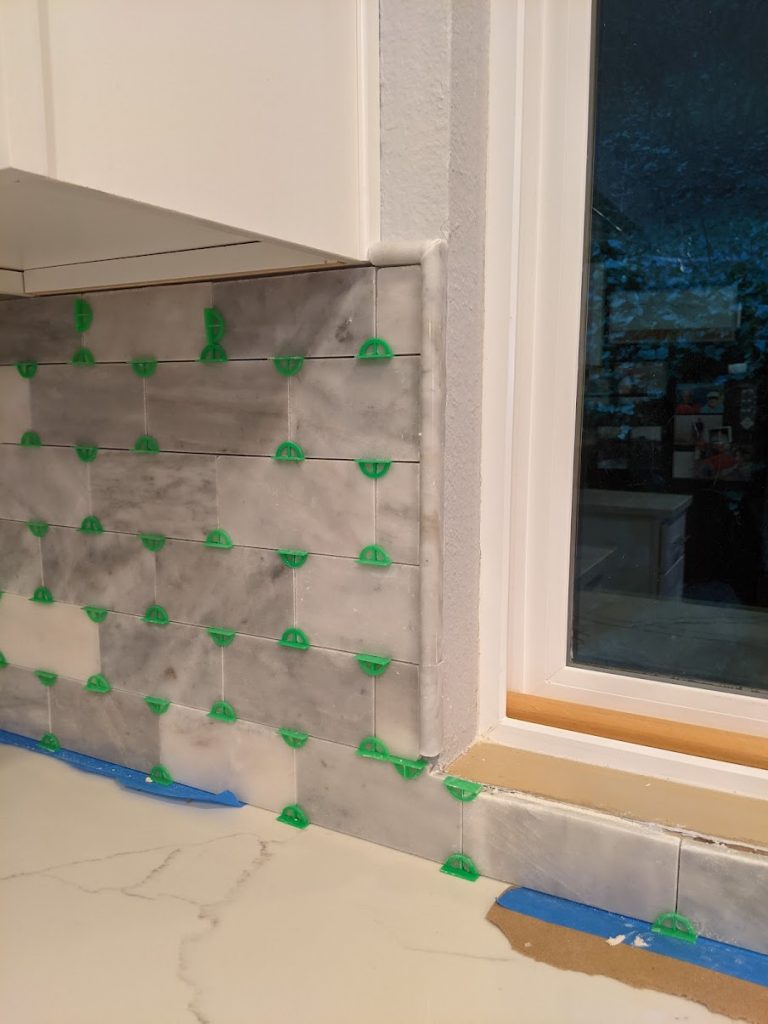
I did a ton of research online before I started. I can’t say I have anything fancy in terms of tools, but I did buy myself a nice wet tile saw. It worked well and I just got to use it again to tile my tub surround. Well worth the $120.
Before you dive in, I should set expectations. I installed the tile over 2 days. The next weekend I did the grout. Then, a few weeks later I installed the window sill and caulked. In whole, the project took about 4 days spread over several weeks.
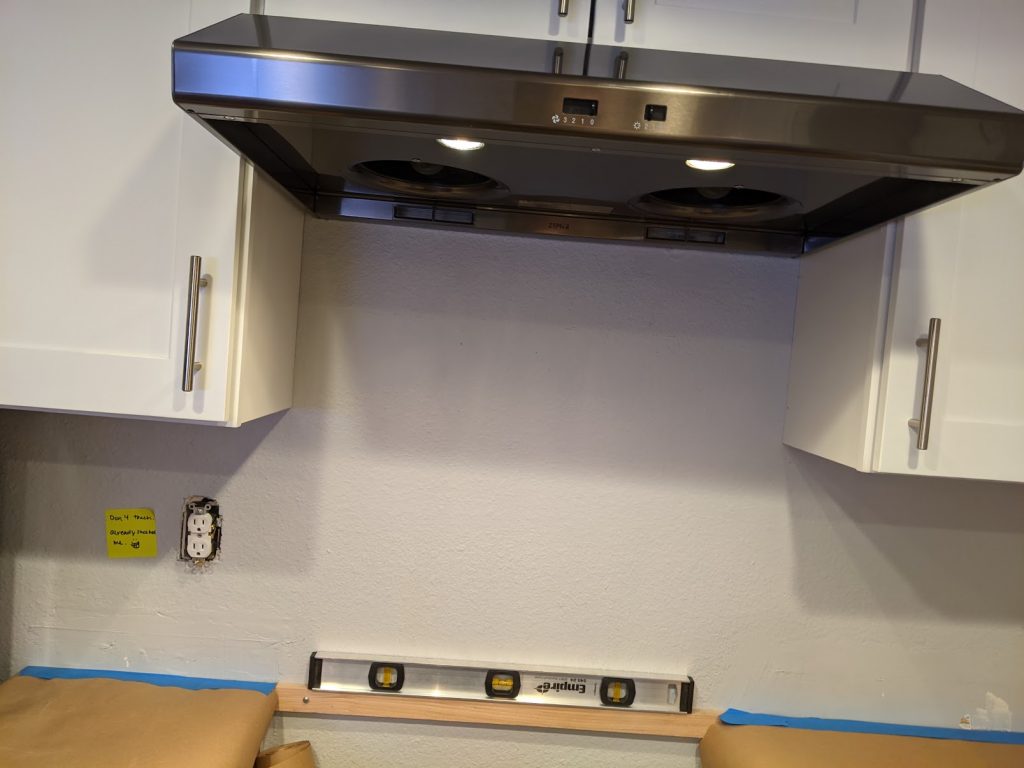
1. Start by moving your appliances out of the way and removing outlet covers.
2. Add a level support if needed behind your stove.
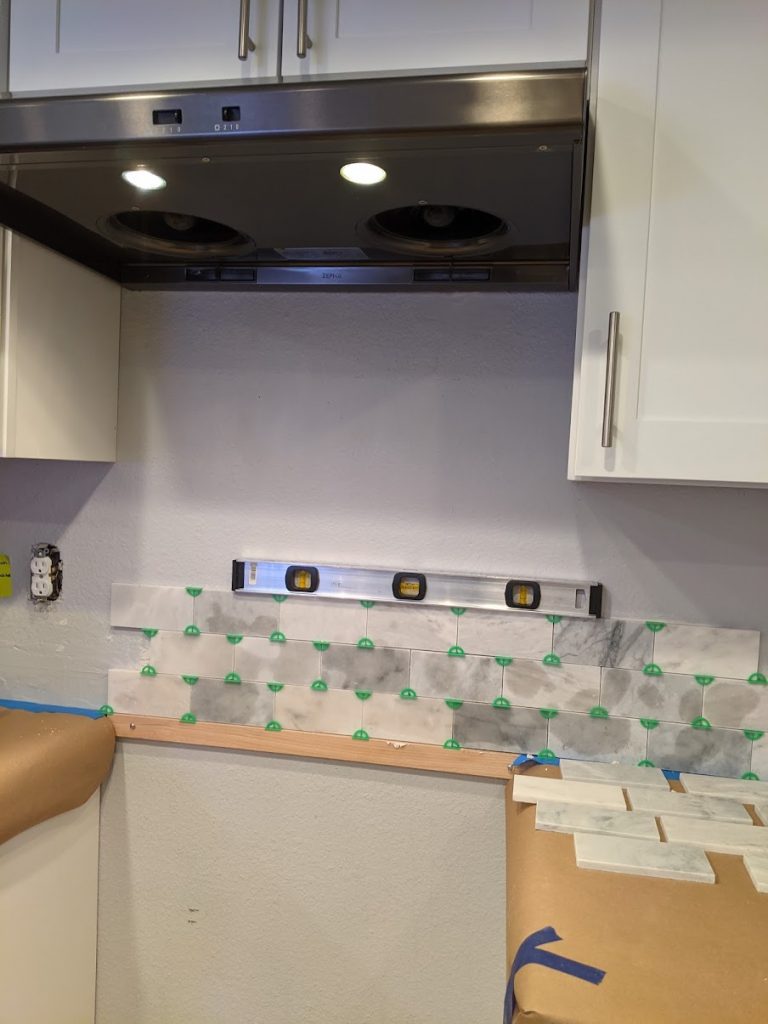
3. You’re going to want to start your tiling so it’s centered at the most visible point in the room. For me, that was the backsplash above the stove. I started at the center here. Unfortunately, when I got to the top of this area I found out the space for the stove is not aligned to the space for the vent above. The difference isn’t much, and no one else will ever notice, but the perfectionist in me hates that everything isn’t perfect. 🙂
4. Check your lines with a level often so you can make minor adjustments if need.
TWO TIPS I LEARNED AROUND NOW!!
– When you are just learning to tile, back buttering each tile is cleaner and easier than spreading the thinset on the wall. It will take longer, but for me, I preferred this approach for this project since there were many cuts and the adhesive would start drying before I would get to putting the tiles up.
– Use a notching system to cut your tiles so you don’t chip them. To do this, you flip the tile over face down and do a short cut on one side. Then, flip it back top side up and finish the cut. This will keep you from getting chips on the front and edge of the tile.
– Natural stone is hard to cut. The marble is very hard and tends to crumble a bit along cuts. Ceramic would have been better as a beginner, but hey, I jumped right in an learned on the tough stuff. When I tiled my shower with ceramic tile it was a breeze.
5. Whew! Day one was productive! I finished that one wall. It took several hours. You can pull the spaces out after a few hours which is fun because the tile will look great.
6. Day two I tiled around the window. The pencil edge tiles are hard to cut because they were crumbly too. They are expensive, but very worth it in my opinion. These gave a high end finished look– my friend who is a relator even commented on how nice they look and that most pros don’t bother with this quality finished look. You’ll see later on that I also added a window sill to full complete the window area. Note, I considered adding trim all the way around the window, but the sides aren’t equal and the one edge is quite slim, so went will something that would minimize the flaws and look great.
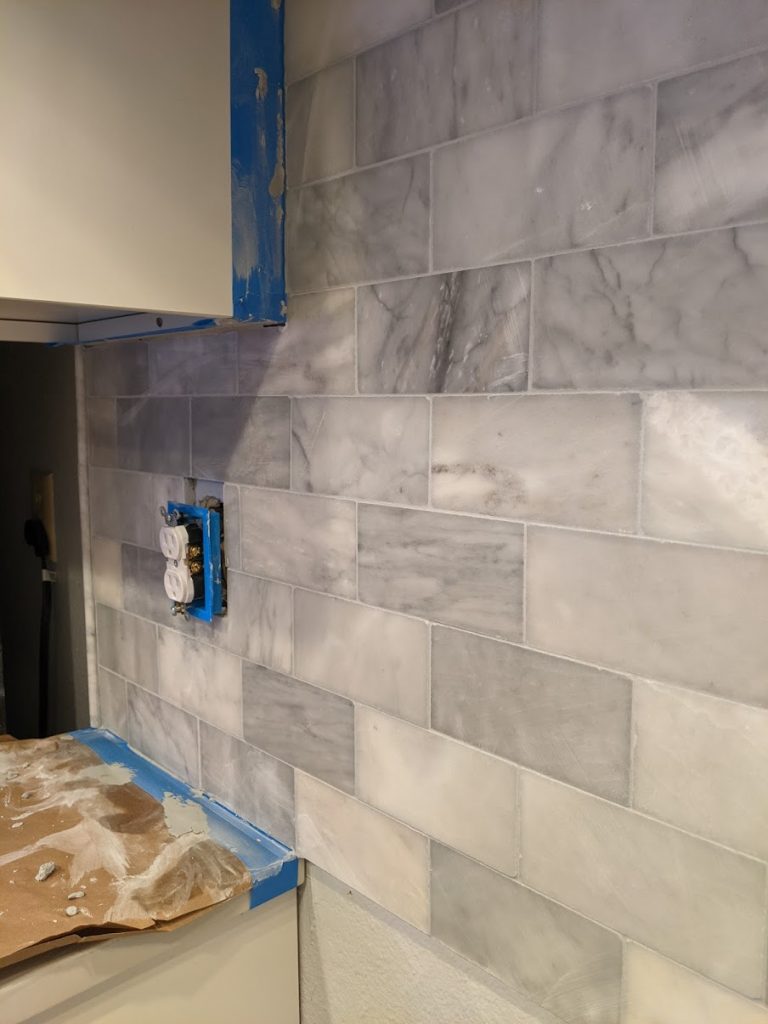
7. Grout day! I went with a platinum grout. From everything I’ve read and looked at in person, it’s best to go with a grout that is close to the color of your tile because it helps hide flaws. Contrasting grout will highlight ever tiny mistake. Also, going with an off white will also keep stains from showing up.
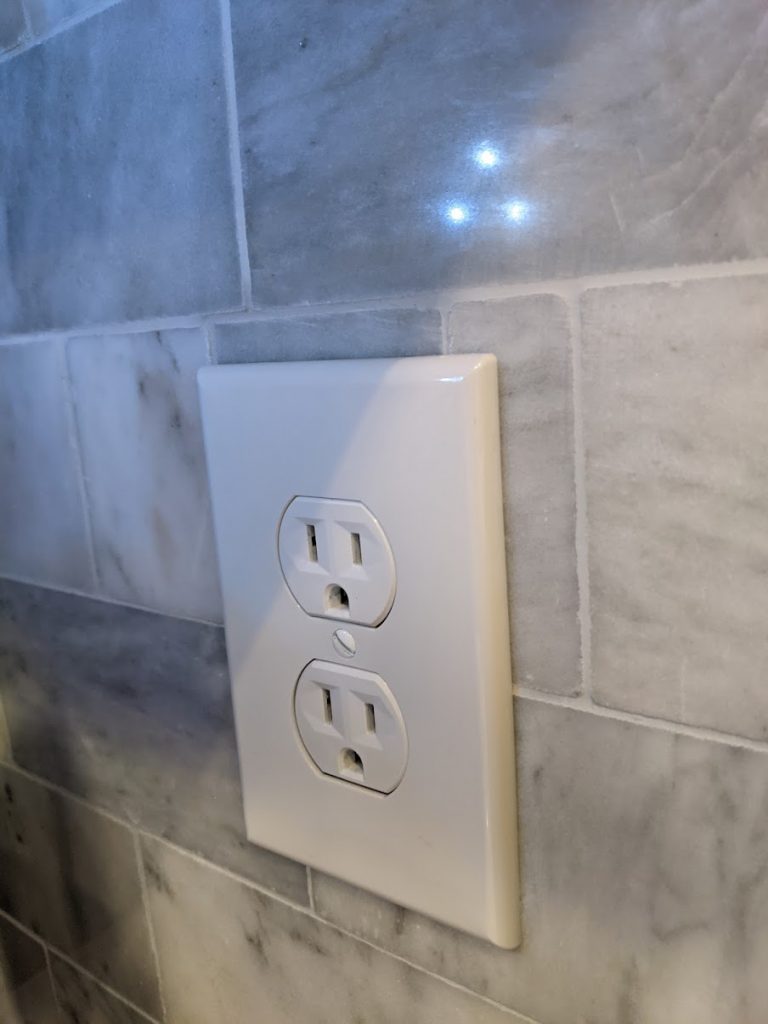
8. Next my hubby found this amazing solution for getting the outlets level. We had tried some of the standard spacers from Home Depot, but we were cutting them, melting them, etc and they still weren’t level. See below for how great these turned out!
Hubby for the win!
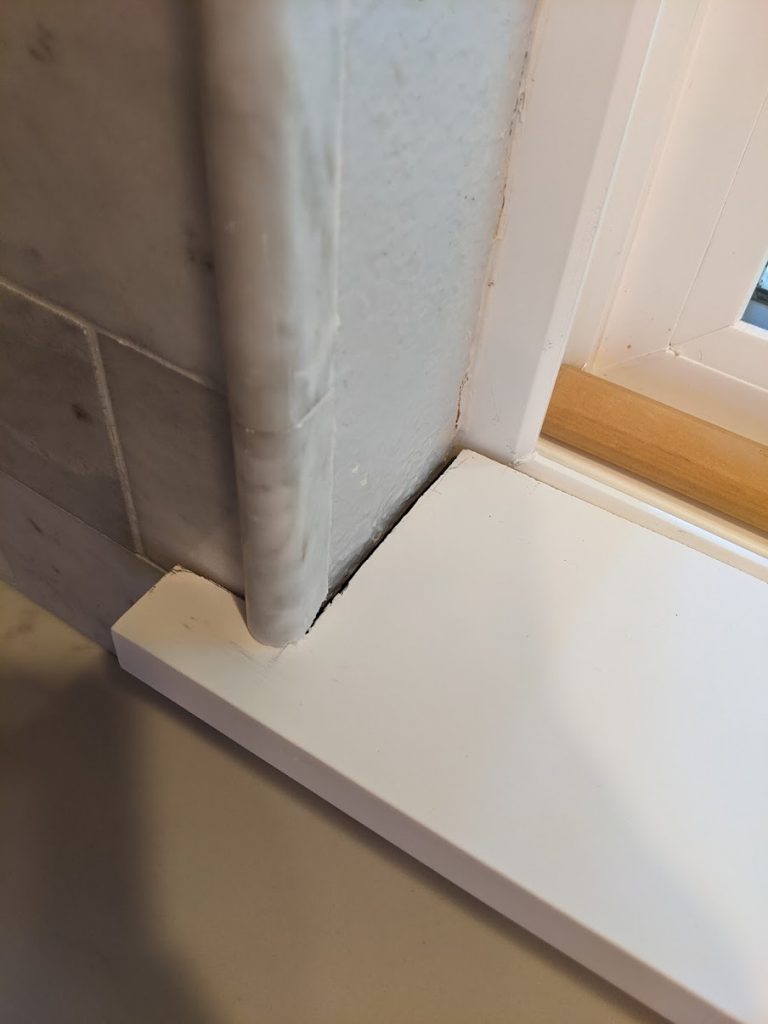
9. We cut a 1×6 to create a nice, custom fit window sill. This took me several cuts because we don’t have a table saw. We used a hand held circular saw for all the cuts. They’re not perfect, but I hid the imperfections with caulk the next day. 🙂
Sharing another look at the full window still and how we finished the tile around the window since I had a hard time finding photos like this online. This is still pre-caulk.
10. We finally caulked and then sealed the tile. Oh my gosh, I just love it. It made our kitchen feel so bright and fancy! Well worth all the hard work.
Love, love, love the end result. Marble subway tile is a great way to dress up your kitchen and looks much more high end than ceramic subway tile.
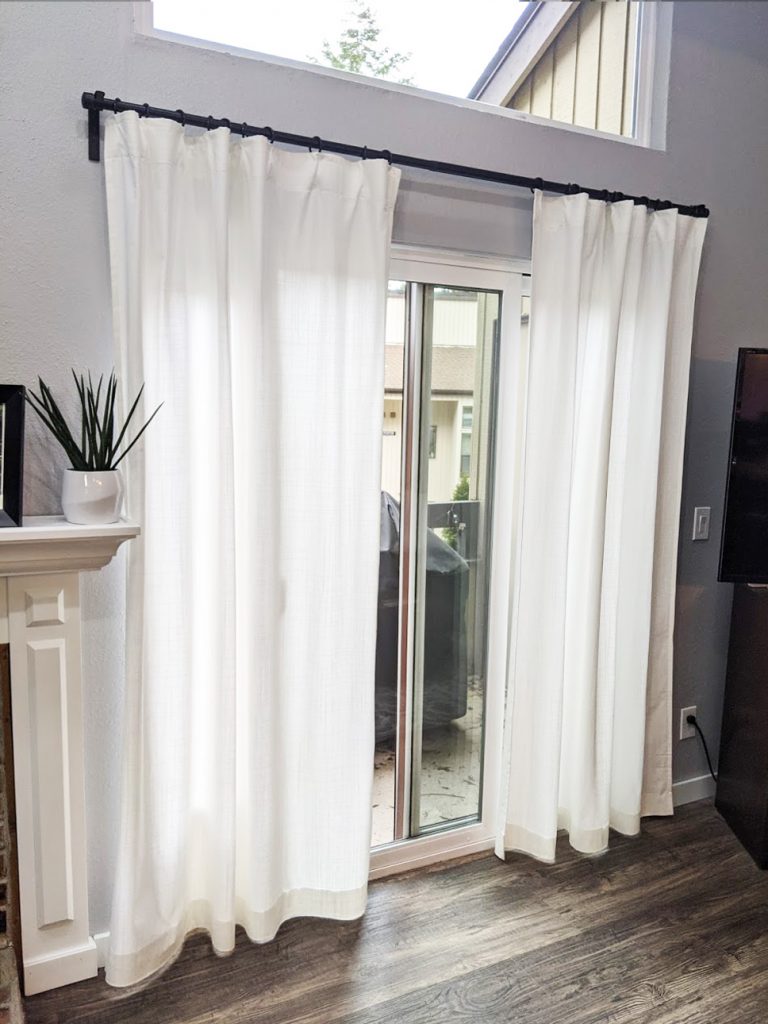
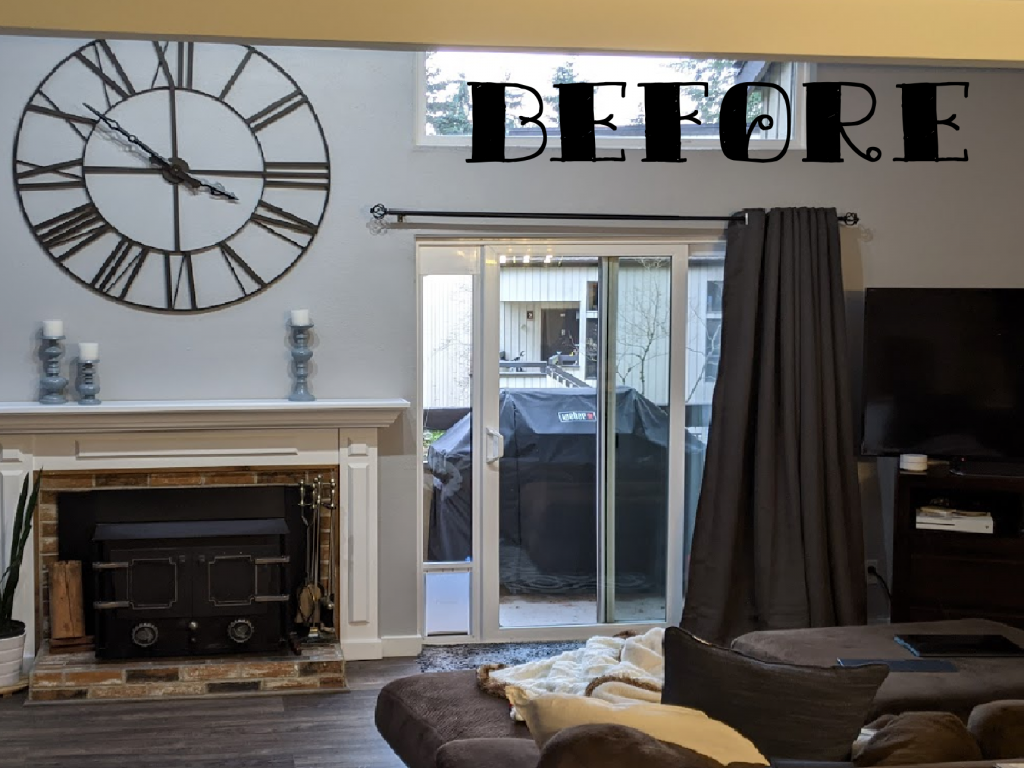
If you’re looking for the easiest way to hem curtains, this is it. This winter I decided it was time for a refresh on our living room curtains. First of all, changing from dark to light curtains made a HUGE difference. Light curtains are a great way to make a room feel bigger and brighter. You can really tell how great it looks in the before and after photos at the end of this blog. I’m smitten with the IKEA RITVA Curtains we now have. The price is great, no sew curtains are quick and easy, and they look really nice.
Step 1: If you don’t already have a curtain rod mounted, you will need to install a curtain rod.
Step 2: Hang the curtains (unhemmed) on the rod and make a mark on the fabric for how long you would like the curtains to be.
Step 3: Plug in your iron and cover your floor with towels. This is really important because your iron will melt polyester carpet, laminate or vinyl floors, etc. Please protect your long term flooring so you don’t have any regrets.
Step 4: Lay the curtains on the towel covered floor. Fold the bottom up and pin the edge you are hemming in place.
Step 5: Measure the hem in several locations across the bottom of the curtain to ensure it’s folded straight.
Step 6: Iron the edge to crease the hemline. (Before you iron the edge, it will be good to test the temp on some of the fabric you are going to cut off later on. That way you don’t burn your beautiful curtains. Again, please protect your carpets. An iron will melt a polyester carpet like the one below. 🙂 )
Rugs melt 🙂 Protect your floors whether they are carpet, rugs, laminate, hardwood, vinyl, etc. A little proactive setup to protect them is definitely worth avoiding damaging them.
The first set of curtains I hemmed, I spent days hand sewing and I will never ever do that again. This method was so easy and the curtains look amazing!
I had to touch up a place where the tape didn’t quite melt all the way. Rather than taking everything down to iron the spot, I took a tip from the DIY Playbook curtain blog and used my hair straightener. Yes, it worked great! I recommend this approach.
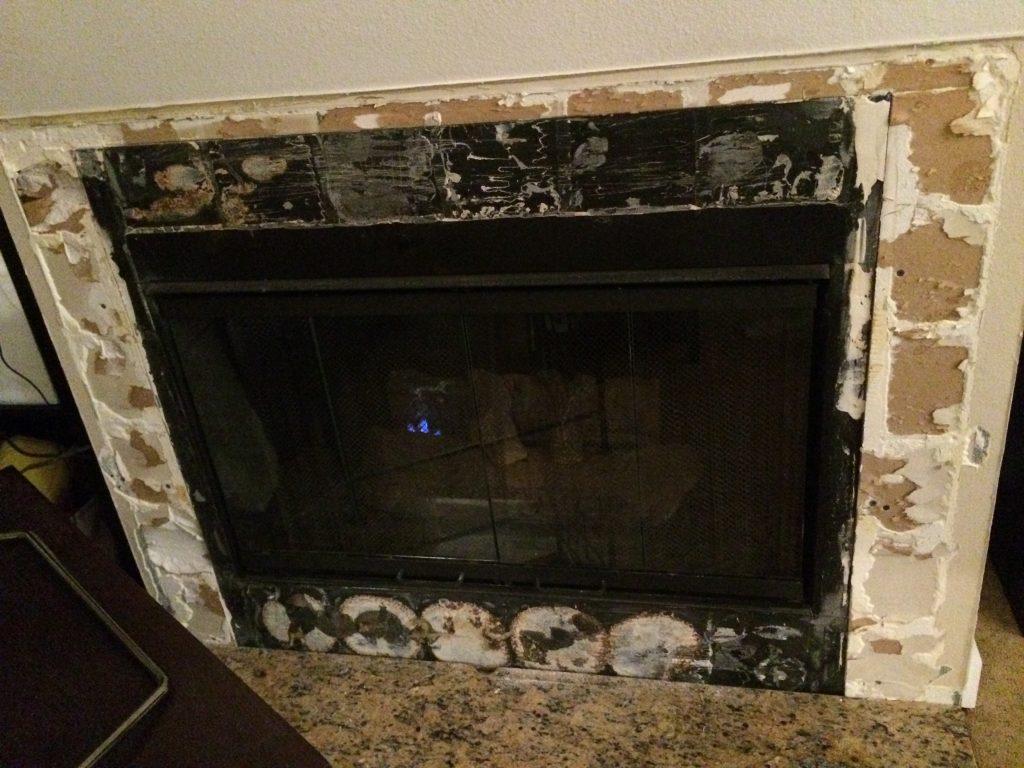
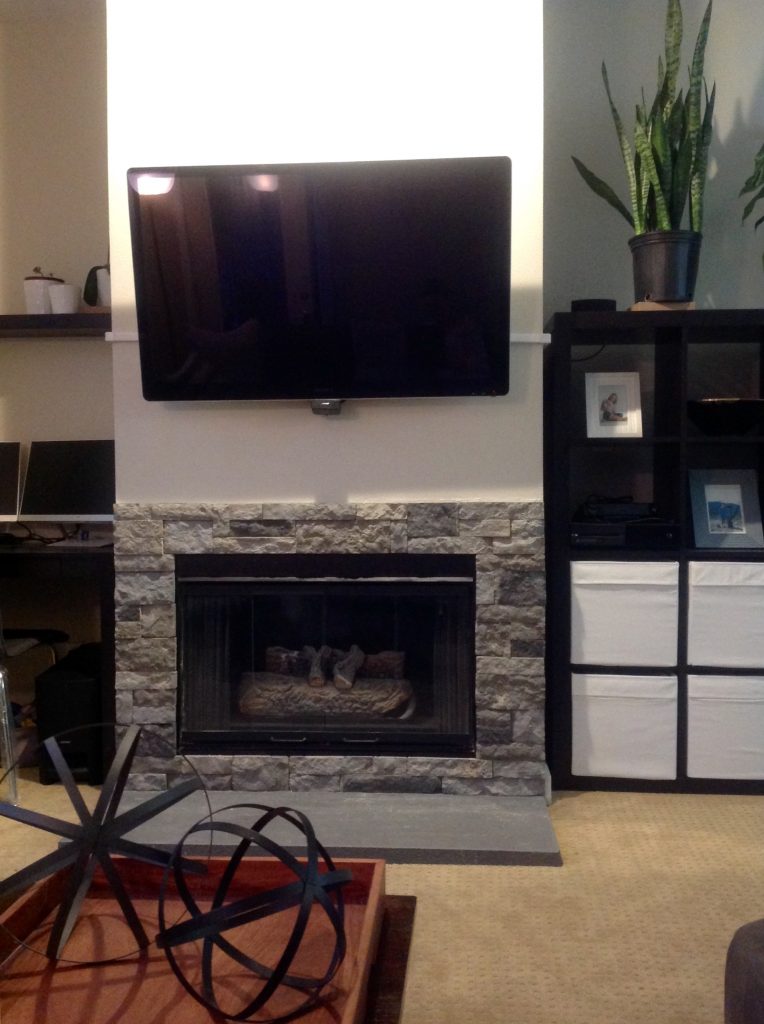
This easy remodel is something a beginner DIY’er can take on. I had a very pink granite around my fireplace when I purchased my home which I didn’t like at all. After reading many bloggers posts, I decided to go with AirStone for the materials. AirStone is an easy product to use. I’m in love with the new look of the fireplace and I’m excited to share the easy things I did for this update.
Step 1: Remove the materials surrounding your fireplace.
Step 2: Patch the surface as needed so there aren’t any major uneven spots. I just used wall patch. Then, lay the hearthstone. For this fireplace, I used a slab of bluestone which was purchased from a local landscaping company.
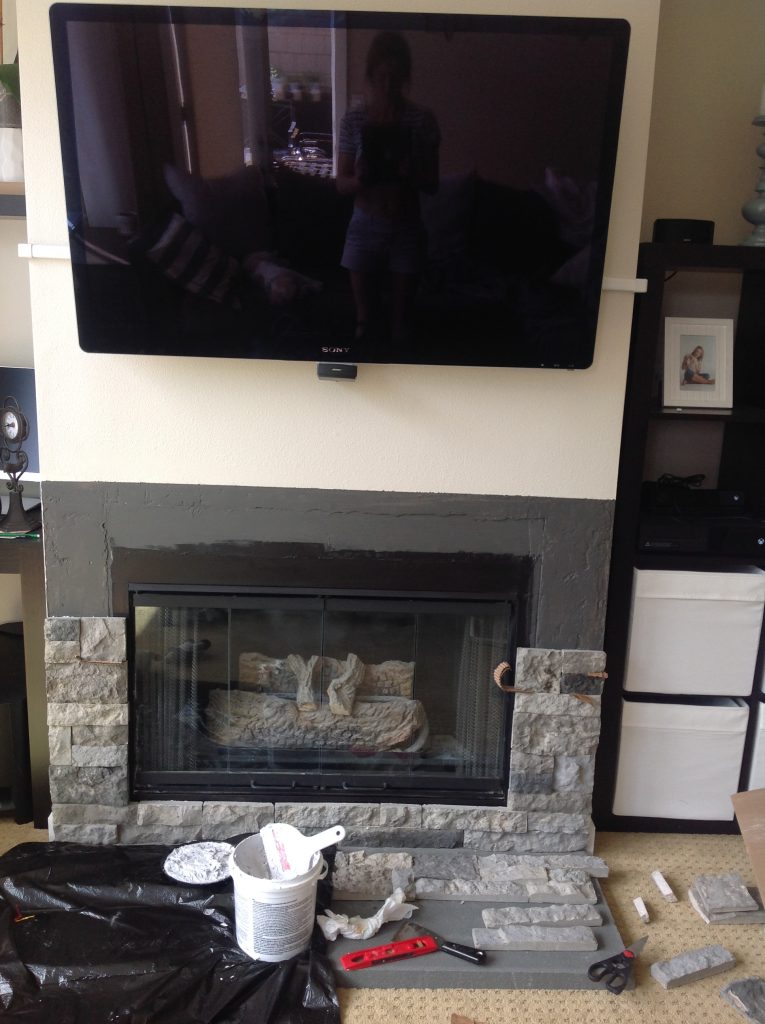
Step 3: Paint the wall a dark color. This is important because if you leave the wall a light color, the light spots could show through the cracks between stones.
Step 4: Start installing the AirStone. I used a hand saw to cut the pieces of stone, and for the adhesive, I used the recommended glue for AirStone. Be sure to use a level for each piece to keep the lines straight, and I used pieces of the cardboard box to help with leveling as needed.
Step 5: There was probably a better way to lay the top row of stone and keep it supported. I just checked on it often and straightened the pieces as needed since (at the time I did this) I didn’t have tools to build a brace to support the row above the fireplace. Once the first row above the fireplace was dry, I started on the rows above.
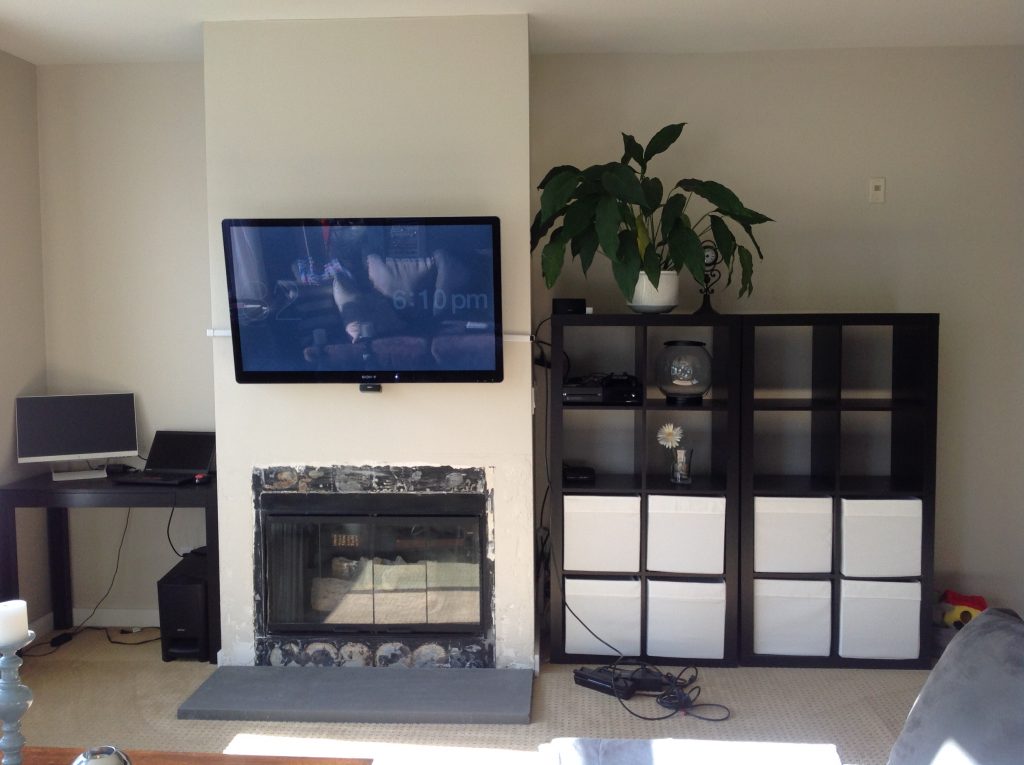
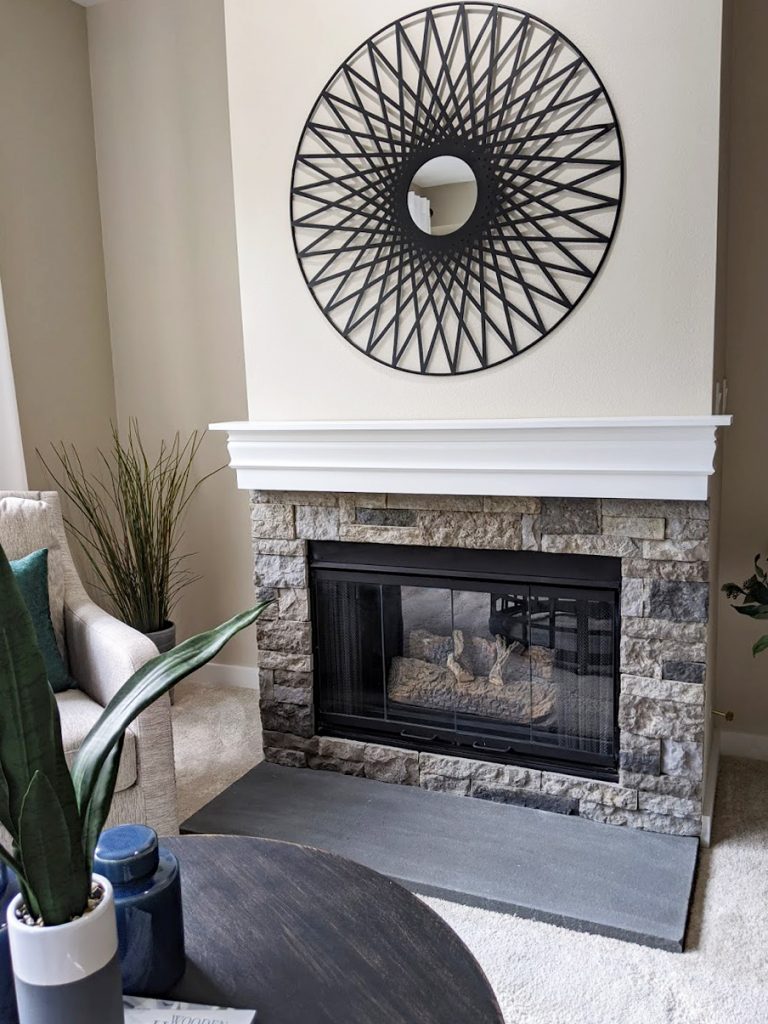
Step 6: You’re done! At this point, I lived with the fireplace as seen above for a year. Once I got ready to sell my condo, I replaced the carpet, added a mantel (I’ll blog about this later), and removed the TV mount. With those extra steps, you can see the finished look below.
Step 7: Pour yourself a glass of wine and enjoy your beautiful new fireplace!
Cut the AirStone outside so it doesn’t get dust in your house. Be sure to protect the surface you are cutting on so you don’t damage the surface you’re cutting on.
Adding a mantel makes a BIG difference. If I had realized this, I wouldn’t have waited so long to add mine.
Not included in this blog, but the glass doors previously had brass frames. I updated those with Rustoleum high heat paint (heat safe). It really updated the look.
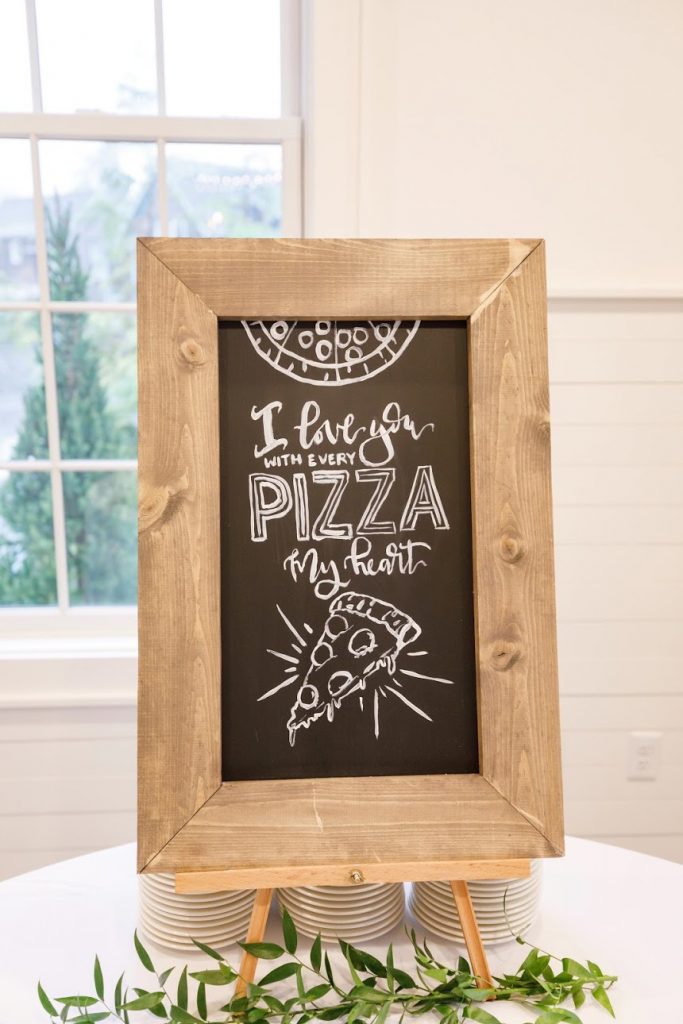
This sign has so much character, and I love a good punny joke! Because I had to wait for paint and glue to dry, I did this project over two days. It turned out great, and we love putting this sign on display for pizza nights with friends.
Step 1: Browse online until you find an image you’d like to use. I decided on this one.
Step 2: Determine how large you want your sign to be, add an inch to all sides and cut a piece of MDF board to fit your sign.
Step 3: Paint the MDF board with black chalkboard paint, and set it aside while it dries and you work on the frame.
Step 4: Get out your 1×4 pieces of pine. Use the original sign size (minus the 1″ you added to all sides) to determine how long your inside cuts should be. Then, use your miter saw set at a 45* angle and cut the 4 pieces for the frame.
Step 5: I like to apply stain before I use glue because glue will cause spots in the stain. Stain the wood with Varathane briarsmoke stain. Paint the stain on with a poly foam brush and then wiped it off within minutes with an old rag. Be sure to wear gloves so you don’t get the stain on your hands– that could make a big mess!
Step 6: Glue the frame together with wood glue to create the outside of the frame and let it dry overnight.
Step 7: Shoot 2″ finishing nails in the corners using your 18 gauge brad nailer to reinforce the corners of the frame.
Step 8: Once your chalkboard is dry, put it on your easel (optional) and get out your projector. Project the design you want to trace onto the chalkboard. Next, trace the design with a pencil. (Note: The projector I linked to is the one I have. While there are higher quality options at higher price points, I find this one does the trick for my signs.)
Step 9: Go over the lines you traced with white acrylic paint. Then, let the paint dry.
Step 10: Glue your new chalkboard sign to the frame and let it dry. You can use your electric staple gun to reinforce the glue if you want to.
Step 11: Put your sign out, invite your friends over, and eat some delicious pizza!
If you look closely at my sign, you can see that I glued the frame before applying the stain, you need to apply the stain before gluing
Go light on the blackboard paint around the edges of the sign if you plan to staple it later on, the blackboard paint is very hard and basic staples can’t penetrate it
I ordered a variety pack of staples, and tried different options until I find staples that were strong and sharp enough to go through
Inspired by: By the Shanty 2 Chic farmhouse sign technique. Photo credit: Azzura Photography (They were our wedding photographers and we highly recommend Ken and Tania)
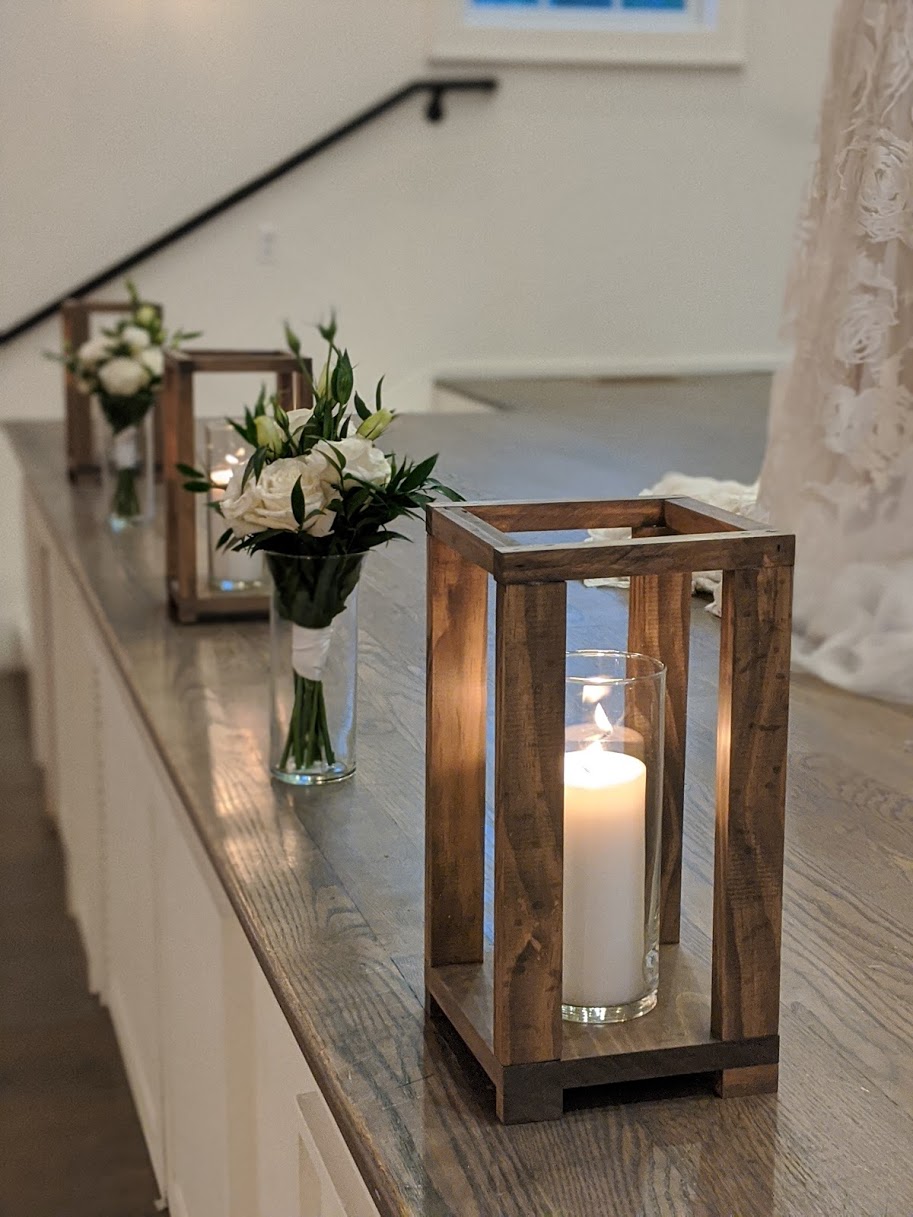
I built these DIY lanterns for my wedding. I absolutely love them and will be using them to decorate my patio next. They are a great beginner project and can easily be modified for the look you like.
Step 1: Determine how big you’d like the base to be. I used a 1″x6″ and cut it into a 6″x6″ square base.
Step 2: Next, take a 1″x2″ board and cut it into 12″ long pieces for the pillars. I glued these pieces into place. Then, use an 18 gauge Bradley nail gun to nail them into place.
Step 3: Cut the 1″x2″ lengthwise to make 1″x1″ pieces. Then cut 2 of the 1″x1″s to be 6″ long and 2 to be 4″ long. These go around the top of the lantern. Glue and nail them into place.
Step 4 (optional): Split your 1″x2″ board again into a 1″x1″. Then, cut it into 2″ long pieces to create feet for the lantern. Glue and nail these into place.
Step 5: Stain the wood with Varathane briarsmoke stain. Paint the stain on with a poly foam brush and then wiped it off within minutes with an old rag. Be sure to wear gloves so you don’t get the stain on your hands– that could make a big mess!
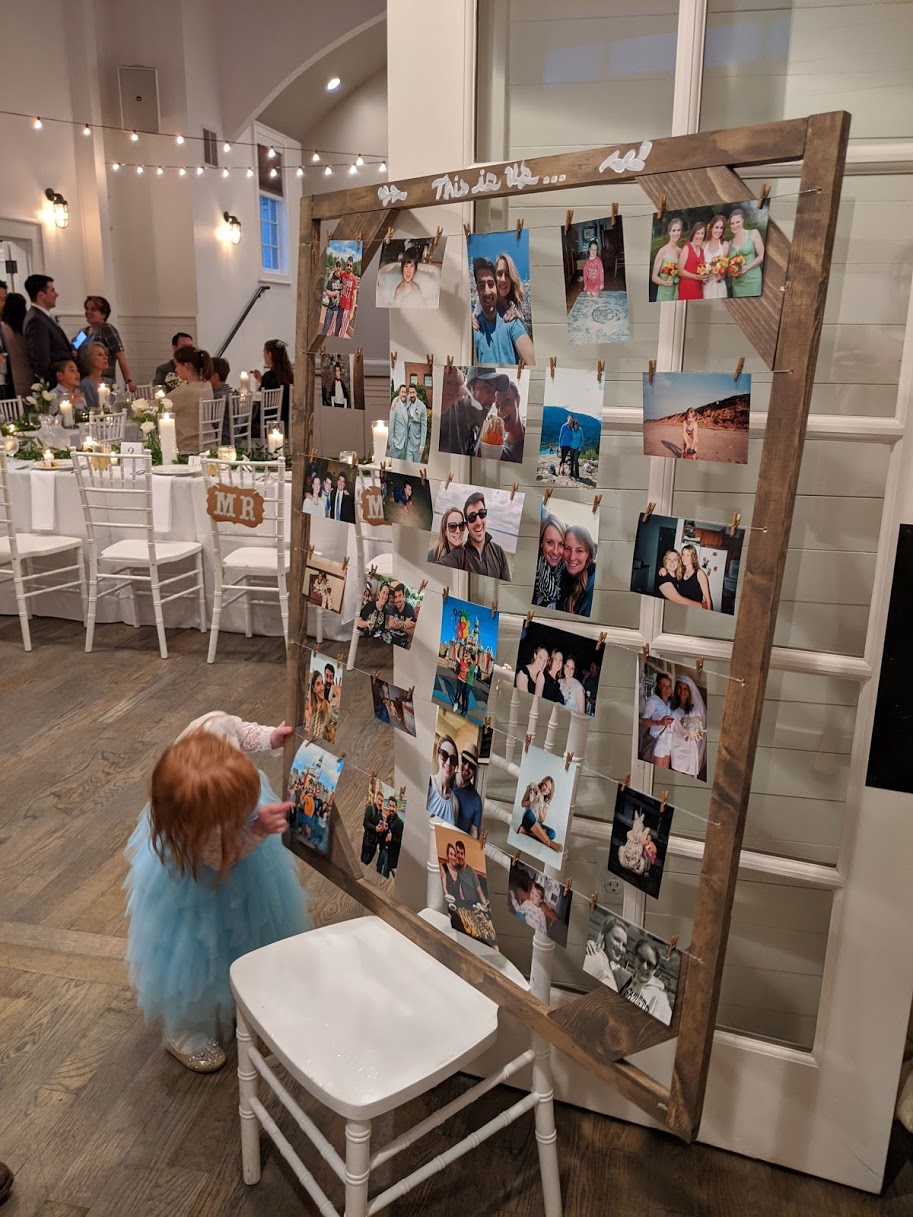
Find out how to build this farmhouse photo display board for your wedding or just for some rustic home decor. Or, you can use this to display kids art.
Step 1: Determine how large you want your photo board to be. Using your miter saw, cut the 1×2’s to that size. The board in the photo is 39″ x 48″.
Step 2: Glue the boards together with wood glue to create the outside of the frame and let them dry overnight.
Step 3: Shoot 2″ finishing nails in the corners using your 18 gauge brad nailer to reinforce the corners of the frame.
Step 4 (optional): Depending on how large your frame is, you’ll need to add supports to the corners. Large sizes like the frame in the photo DEFINITELY needs the supports. The supports shown are 11″ on the long side and cut on a 45* angle. As long as you get the angles right, the length of the support can vary. Next, glue your supports in place. Then, shoot nails to reinforce them.
Step 5: Stain the wood with Varathane briarsmoke stain. Paint the stain on with a poly foam brush and then wiped it off within minutes with an old rag. Be sure to wear gloves so you don’t get the stain on your hands– that could make a big mess!
Step 6: Drill holes for photo wire. I started 3″ from the top of the frame and drilled holes every 7″. This allows enough room for 5×7 photos to be placed in portrait or landscape orientation.
Step 7: String photo wire between the holes. Cut with wire cutters. Then, secure the wire using an electric staple gun to staple the wire to the back of the frame. I zig-zagged the wire and stapled it several times to make sure it was extra secure.
Step 8: Paint and decorate the frame however you want to. I used white acrylic paint.
A frame this big needs supports in the corners or it will not be sturdy enough to transport
Photo wire remained much tighter than string when photos were hung
If you want to give it a tray, drilling holes and using screws may be stronger than glue and finishing nails (If you try this, let me know how it goes!)
I didn’t build a stand for this, but our wedding coordinator was amazing and set it on a chair and against a wall
Inspired by: this photo display, but needed something that didn’t have to be mounted to a wall. Photo credit: Brittni Adams