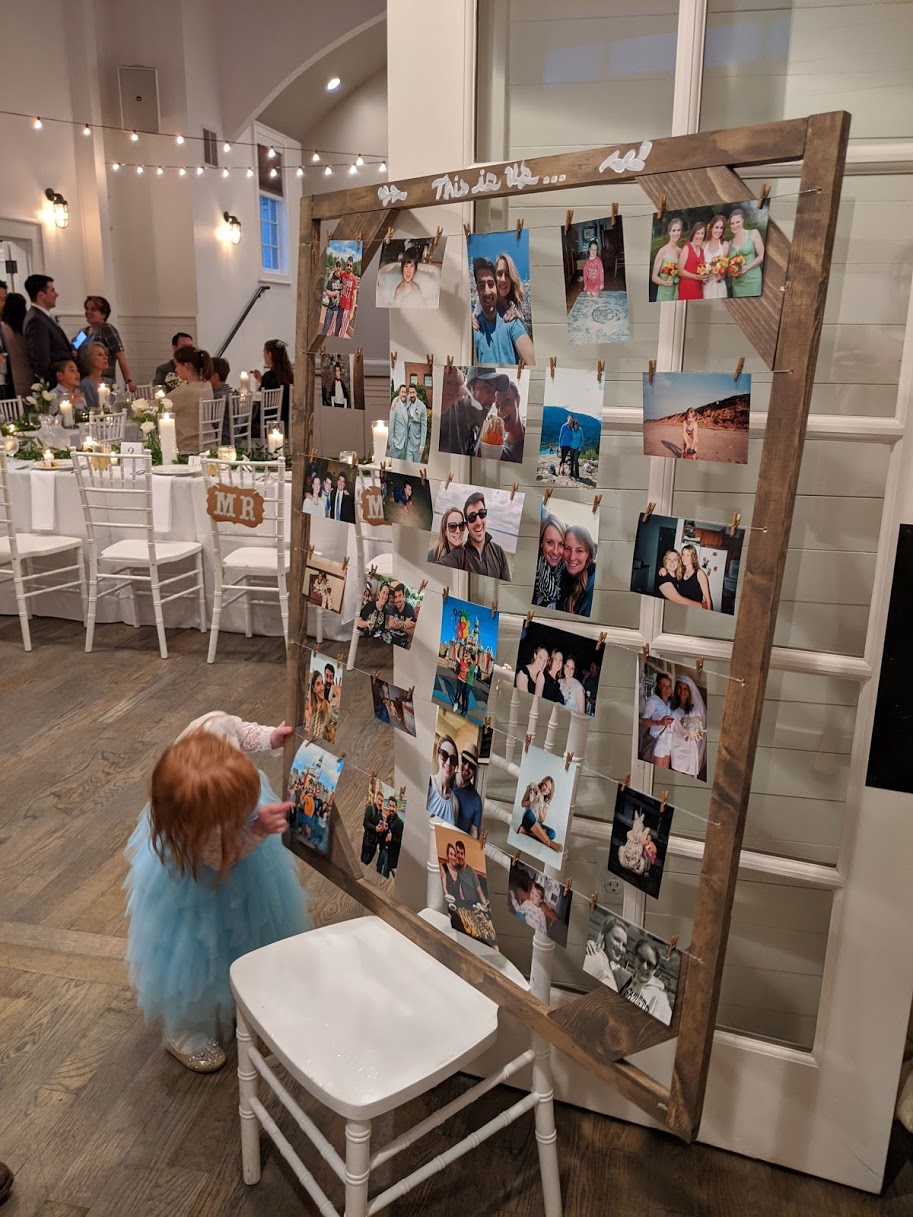
Find out how to build this farmhouse photo display board for your wedding or just for some rustic home decor. Or, you can use this to display kids art.
Step 1: Determine how large you want your photo board to be. Using your miter saw, cut the 1×2’s to that size. The board in the photo is 39″ x 48″.
Step 2: Glue the boards together with wood glue to create the outside of the frame and let them dry overnight.
Step 3: Shoot 2″ finishing nails in the corners using your 18 gauge brad nailer to reinforce the corners of the frame.
Step 4 (optional): Depending on how large your frame is, you’ll need to add supports to the corners. Large sizes like the frame in the photo DEFINITELY needs the supports. The supports shown are 11″ on the long side and cut on a 45* angle. As long as you get the angles right, the length of the support can vary. Next, glue your supports in place. Then, shoot nails to reinforce them.
Step 5: Stain the wood with Varathane briarsmoke stain. Paint the stain on with a poly foam brush and then wiped it off within minutes with an old rag. Be sure to wear gloves
so you don’t get the stain on your hands– that could make a big mess!
Step 6: Drill holes for photo wire. I started 3″ from the top of the frame and drilled holes every 7″. This allows enough room for 5×7 photos to be placed in portrait or landscape orientation.
Step 7: String photo wire between the holes. Cut with wire cutters
. Then, secure the wire using an electric staple gun
to staple the wire to the back of the frame. I zig-zagged the wire and stapled it several times to make sure it was extra secure.
Step 8: Paint and decorate the frame however you want to. I used white acrylic paint.
Step 9: Have fun adding photos using mini clothespins.
SUPPLIES
2x 1x2x8″ pieces pine wood
scrap pieces of pine for supports
glue
Varathane briarsmoke stain
poly foam brush
gloves
photo wire
white acrylic paint
mini clothespins
TOOLS
miter saw
18 gauge brad nailer
electric staple gun
wire cutters
KEY LEARNINGS
- A frame this big needs supports in the corners or it will not be sturdy enough to transport
- Photo wire remained much tighter than string when photos were hung
- If you want to give it a tray, drilling holes and using screws may be stronger than glue and finishing nails (If you try this, let me know how it goes!)
- I didn’t build a stand for this, but our wedding coordinator was amazing and set it on a chair and against a wall
Inspired by: this photo display, but needed something that didn’t have to be mounted to a wall. Photo credit: Brittni Adams